About
docs.netmaker.io is being deprecated.
Please visit learn.netmaker.io for our latest documentation
What is Netmaker?
Netmaker is an open-source virtual networking platform built on WireGuard®, designed to connect devices, servers, containers, and users across any environment. It automates the creation and management of secure overlay networks, helping teams reduce complexity, improve performance, enhance security, and scale seamlessly to hundreds or even thousands of nodes, networks, and users.
With Netmaker, you can connect cloud, on-premises, and edge resources under a single, encrypted network, making distributed infrastructure feel like one unified local network.
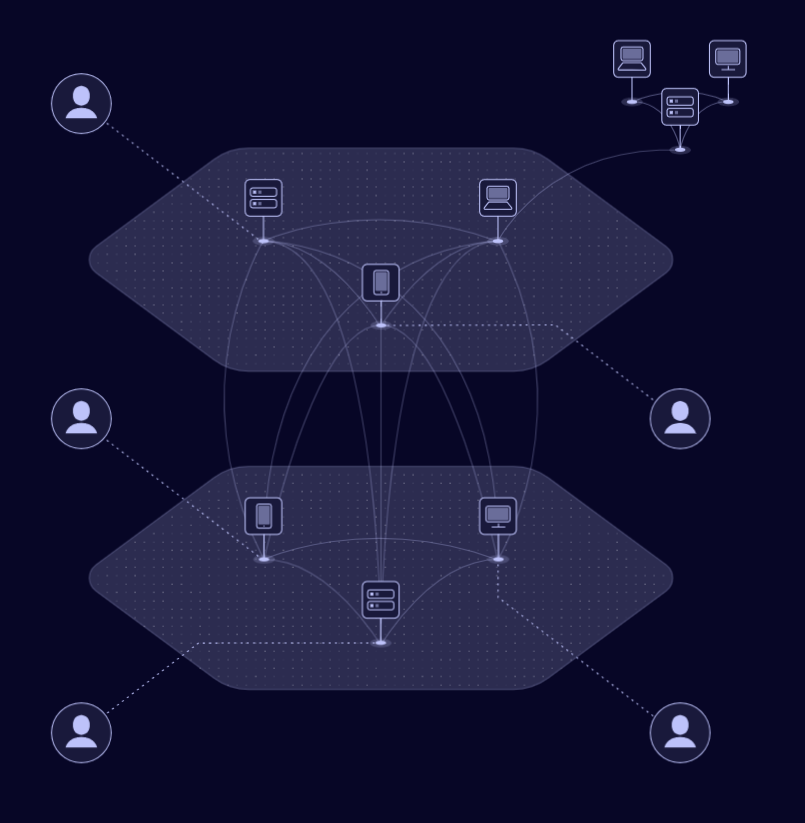
Netmaker creates a flat, encrypted network where all devices can communicate securely. From a machine’s perspective, every other node is “next door,” even if they are spread across the world.
Think of it as an AWS VPC for arbitrary computers — Netmaker gives you the flexibility to scale and manage multiple environments, networks, and users.
Netmaker also enables you to control traffic flows using:
-
Gateways → Manage incoming and outgoing network traffic.
-
Security & Access Policies → Control which devices or users can communicate. Supports integration with IDPs such as Google, Microsoft Entra ID (Azure), and Okta for authentication, SSO, and centralized user management.
-
Egress routing → Route traffic through selected egress nodes based on domain(s) or IP range(s), giving fine-grained control over network paths.
This makes it possible to build advanced patterns like remote access, multi-site connectivity, and private networks.

Netmaker has many similarities to Tailscale, ZeroTier, and Nebula. What makes Netmaker different is the speed and flexibility. Netmaker is faster because it uses kernel WireGuard. It is more flexible because it lets you build many different types and patterns of networks, and also gives you the choice of how endpoints are added to the network, with three different client-side applications. And, of course, you can also self-host Netmaker, to give you complete control of your network traffic.
How Does Netmaker Work?
Netmaker relies on WireGuard to create encrypted tunnels between machines, while the platform automates configuration and routing.
Components
Netmaker consists of several key components that work together to create a secure, dynamic overlay network:
1. Netmaker Server
-
Acts as the central configuration and orchestration hub.
-
Can be self-hosted or deployed via Netmaker SaaS.
-
Stores network and device configurations and pushes updates to all nodes automatically.
2. Clients
Netmaker supports multiple client types:
-
Netclient → Headless agent for servers, IoT devices, or routing nodes. Runs on Windows, Linux, macOS, and Docker.
-
WireGuard Endpoints → Pure WireGuard tunnels for any compatible device.
-
Netmaker Desktop → User-focused app for secure remote access with authentication, authorization, and session expiry.
3. Message Queue (MQ)
-
Ensures reliable communication between the server and clients.
-
Synchronizes configuration changes dynamically across the network.
4. DNS Service
-
Provides hostname resolution across all nodes.
-
Supports domain-specific rules (match specific domains) or catch-all resolution.
-
Configurable name-servers can be scoped to specific peers, allowing fine-grained control over which devices use which DNS servers.
-
Eliminates the need to memorize IP addresses and ensures predictable connectivity.
The server manages network configurations, while clients report local changes (IP, ports). This enables a fully dynamic, self-updating network.
Netmaker Offerings
Netmaker provides a range of options tailored to suit different use cases and organizational needs. Whether you’re a small team, a growing business, or a large enterprise, Netmaker provides the right tools to improve security, efficiency, and scalability
Open-Source (Community Edition)
Built for developers and small teams, the Community Edition provides core networking features with the flexibility of open-source customization.
-
Technical Highlights:
-
Integrated DNS server to manage private network resources seamlessly.
-
Egress traffic capabilities for external network access.
-
Simplified setup with full control over configurations and deployment.
-
Limited advanced features, but capable of handling lightweight networking needs.
-
-
Use Case: Best for developers and teams starting with small-scale or non-critical networking setups.
On-Premises (Professional Edition)
Designed for complete control, the On-Premises edition allows you to run Netmaker in your private infrastructure, whether on physical servers or in your private cloud.
Technical Highlights:
-
Full control over deployment and configurations.
-
Integration with custom authentication systems, such as OAuth providers or your Identity Provider (IDP) for single sign-on (SSO) and centralized access management.
-
Enhanced privacy with data stored entirely within your infrastructure.
-
Ability to use advanced features like FailOver Servers and custom ACLs.
-
Built-in metrics and observability, providing detailed insights into network performance, peer health, and traffic flows.
Use Case:
Perfect for organizations with strict compliance needs, requiring centralized authentication, or those wanting a fully self-managed, secure, and observable network with advanced customization options.
SaaS (Professional Edition)
Hosted in the cloud and managed entirely by the Netmaker team, the SaaS edition provides enterprise-grade networking with minimal setup.
-
Technical Highlights:
-
Automatic scaling of resources based on network usage.
-
Built-in redundancy and high availability for reliable performance.
-
Seamless updates and patches, ensuring you’re always on the latest version.
-
Managed security configurations to safeguard your data.
-
-
Use Case: Ideal for businesses that need rapid deployment and scalable solutions without handling infrastructure.
For a detailed list of features in both the Pro and Community Editions, check it out here.
Use Cases for Netmaker
There are many use cases for Netmaker. In fact, you could probably be using it right now. Because of Netmaker’s extreme speed, there is almost no cost to putting a Netmaker overlay network on top of any existing Network.
This is a sample of how some users use Netmaker in production today. Guided setup for many of these use cases can be found in the How-To Guides or on our Blog or YouTube channel.
-
Automating and managing large WireGuard-based networks.
-
Secure access to home or office networks.
-
Remote management of servers, edge sites, robots, or drones.
-
Site-to-site connectivity (e.g., customer to cloud)
-
Testing and development environments with isolated, easily reconfigurable networks.
-
Overlay networks for temporary projects, events, or pop-up infrastructures..
-
Private IoT networking for secure device data transfer.
-
Multi-cloud networking across AWS, Azure, GCP, or hybrid environments.
-
Secure remote access for distributed teams and contractors.
-
Connecting Kubernetes clusters across regions or cloud providers.
-
Secure collaboration between branch offices and headquarters.