Troubleshooting
Overview
Here are some helpful troubleshooting steps for networking issues you may encounter while setting up your network.
Netclient Connectivity Issues
On the netclient side, there could be many reasons why connectivity is not working as expected. We will go through some common troubleshooting steps for netclient connections.
Verify Netclient Installation
First, we can check to see if the netclient installation has also installed the necessary wireguard-tools package. To check, we can simply execute the “wg” command on the terminal and see if the command returns a response something like what is shown below:
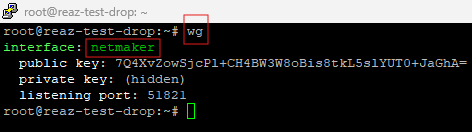
The response should show the WireGuard interface named as “netmaker”. If the “wg” command does not work and it shows command not found, then we can simply execute the wireguard-tools installation command which is “sudo apt install wireguard wireguard-tools -y” command to install the necessary tools for accessing the linux kernel wireguard.
To verify the netclient installation, we can simply execute the command “netclient” in the terminal to view all the available netclient commands as shown below:
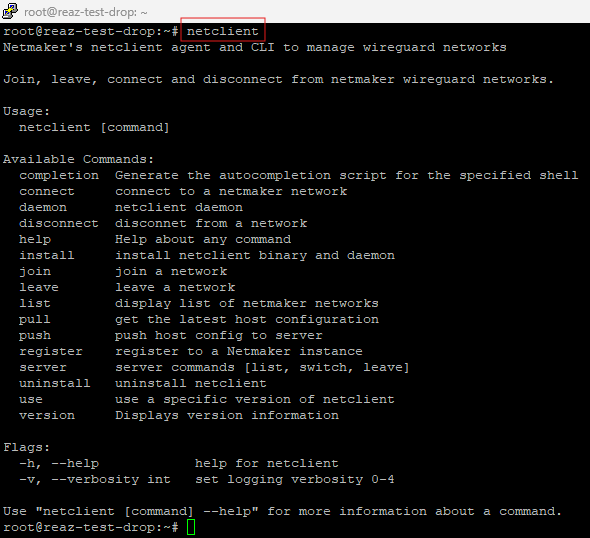
If the “netclient” command fails or shows no command found, then probably there was an error while installing netclient. We should try re-installing netclient following the documentation here:
https://docs.netmaker.io/docs/netclient
To make sure that we have netclient installed properly and the netclient daemon running as expected, we can simply execute the “systemctl status netclient” command on debian based linux distros to show up the netclient daemon’s current status. The status should be in the “active (running)” state for proper operation as shown below:
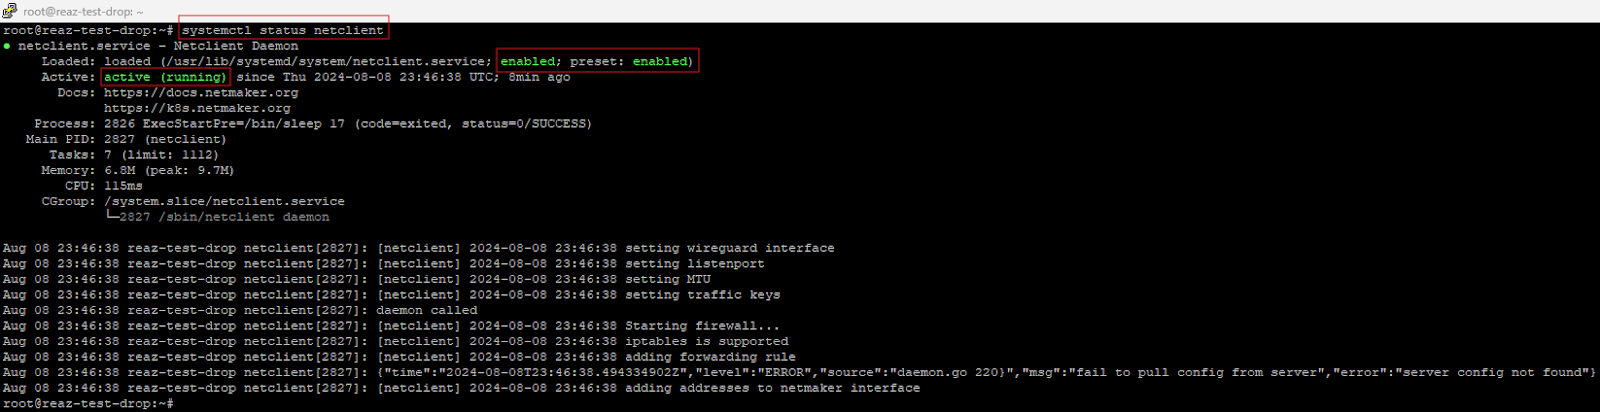
If there is an error or a different status, we can simply try to use the command “netclient install” to fix the netclient daemon service.
If the problem still remains, the “netclient uninstall” command and then re-installation of netclient should fix the issue.
Verify Network Connectivity
After joining a netmaker network, the netclient and wireguard connectivity status can be verified using couple of commands. “netclient list” should show the netmaker network name and details which the netclient joined. “netclient server list” command should show the netmaker server name which the netclient joined. And finally the “wg” command should list out all the peers of the netmaker network and their connectivity status such as handshakes, bytes transferred etc.
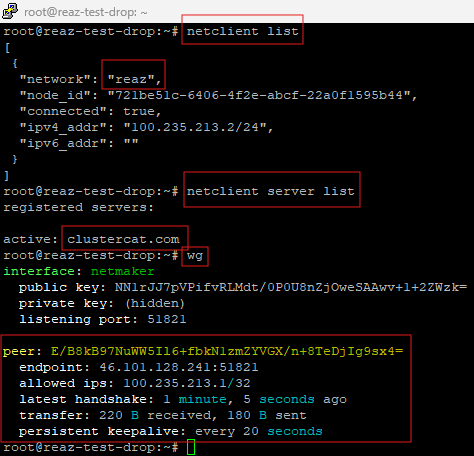
If the “netclient list” or “netclient server list” commands do not show any network or server information, please try to rejoin the netmaker network using the netmaker join command and specific enrollment key.
If there are no peers listen on the response from “wg” command even though multiple netclient hosts are present inside the netmaker network, try executing “netclient pull” command to manually sync the latest netclient configurations and peers list from the netmaker server as shown below:

The netclient may fail to connect to other clients in the network for various reasons. Some common issues that may occur include:
-
Unable to establish connection to server over MQ Failure to receive peer update.
-
Failure to create correct local network routes.
-
Unable to establish connection via TURN.
Some basic troubleshooting steps you should take in the event that your client is unable to connect to other clients in the network. This includes:
-
Run sync from server.
-
Run pull from the netclient machine.
-
Restart system daemon using the command “systemctl restart netclient”.
-
Check the netclient node status on the node interface of your network.

-
Relaying the client through another publicly accessible netclient machine as the relay server.

If the issue still persists, looking into the netclient logs might provide more insights about the specific problem. Check the netclient logs using the command “sudo systemctl status netclient@<insert network name>” or you may also run “sudo journalctl -u netclient@<network name>”. Note for journalctl: you should hit the end key to get to view the most recent logs quickly or use “journalctl -u netclient@<network name> -f” instead.
Firewall Blocking Issues
Netclient manages WireGuard on client devices (nodes). As its name suggests, Netclient is a client in a mesh topology, thus it needs to communicate with the server and with the other clients as well. Netclient will detect local changes and send them to the server when necessary. A change to IP address or port will lead to a network update to keep everything in sync. It goes without saying that in almost all cases it is imperative that firewall must be up and running on any device that is connected to a network, especially the internet. Firewalls are inherently restrictive for good reasons. And by default, it doesn't allow any traffic that Netclient would use to function properly. The rules which are necessary to be applied to the firewall are as follows:
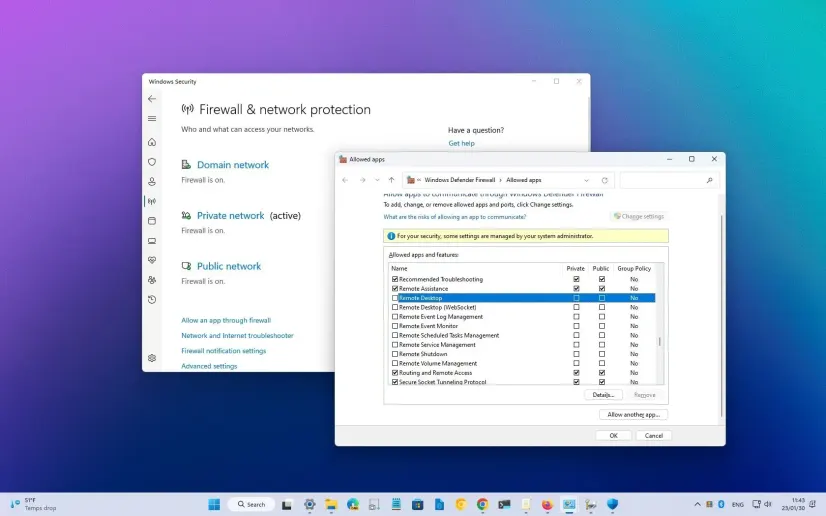
On Windows machines, it is possible to allow programs or applications through the firewall. Thus you might want to allow Netclient and, depending on your setup, WireGuard.
On Linux, these necessary ports are needed to be opened:
-
UDP and TCP ports 51821-51830, or your own custom static ports.
-
TCP port 443
-
UDP ports 19302 & 3478 for STUN
-
UDP and TCP port 53 for DNS (optional)
To open ports in linux iptables firewall, we can simply use the following command: “iptables -A INPUT -p udp --dport 51821 -j ACCEPT”
For advanced use cases, you might need to view your device's firewall logs, or in case of Netclients behind a NAT, your Firewall-Appliance/Router's firewall logs. Look for blocked traffic coming in and out having origin/destination IPs of your devices.
For example, in UFW you may do:
# set firewall to log only the blocked traffic
“ufw logging low”
# clear out the current logs
“cat /dev/null | sudo tee /var/log/ufw.log”
# reload ufw
“ufw reload”
# filter the logs
“cat /var/log/ufw.log | grep -e <netmaker server IP> -e <other nodes' IPs>”
MTU Issues
If there is a wireguard handshake but still cannot ping the peer, this is commonly due to incorrect MTU settings. Typically, it will be because MTU is too high. Try setting MTU lower on the node. This can be done via netconfig, or by editing the netclient host in the netmaker web UI.

NOTE: We recommend a minimum MTU of 1280 due to most router configs having an expectation of a standard MTU setting and IPv6 requiring 1280 as a minimum. going lower than that may cause issues.
Unresponsive Netclient / Segmentation Error
If you are suddenly getting "Segmentation Errors" on the machine. Netclient stopped working and you can't do “netclient uninstall” because it is throwing the error. In fact, you can't do any netclient commands at all. The issue might have been caused by some operation on your OS. Could be a failed update or an incidental minor fault of one of the hardware parts. Or maybe premature termination while netclient is being installed or being updated. Reinstall netclient. It will automatically override/replace the existing faulty or corrupted one. Re-join your machine to the network if necessary.
Incorrect IP
If a Netclient is not using the expected or preferred endpoint (IP Address) for connections, you can set the endpoint statically in your UI, and this will become the IP Address for all connections from this machine. To set the static endpoint.
This process can also be used to turn off Endpoint Detection, which will route using local addresses when available. If you only want to turn off Endpoint Detection, skip Step 5.
1. Go to the All Devices interface

2. Select the device you would like to modify
3. Click Edit

4. Switch on "Static Endpoint"

5. Enter the correct IP and click "Update Device"
6. Return to the Devices interface and see that the IP has been modified
Relays
We have created a relay server and one relayed client through the netmaker web UI. But it seems like the traffic from the relayed client is not getting forwarded by the relay server.
Relay servers should have the necessary ports opened and publicly reachable as shown in previous steps.
We can do a traceroute from the relayed client to another client inside the netmaker server. The traceroute should show which hop exactly the traffic is stopping at. For doing traceroute on ubuntu we need to first install the traceroute package using the command “sudo apt install traceroute” and then simply type “traceroute <ip address>” (replace the ip address with the netmaker network ip address of the client we are trying to reach) to do a route analysis.

If there is a hop where no reply is found, it will be shown as “*”. If the traceroute stops at the relay server and then shows “*” for the destination ip address, it might be an issue with the linux forwarding rule. To enable linux ip traffic forwarding, use the following two commands:
“echo "net.ipv4.ip_forward = 1" >> /etc/sysctl.conf”
“sysctl -p”
Check the firewall configuration of the relay server to make sure it can receive and forward traffic to and from its main WAN interface. This should be verified on the specific router or VPC side of the relay server’s provider.
Make sure netmaker’s default iptable rules exist on the relay server using the command “iptables -L” as shown below.

Repeat the above steps excluding the enablement of the linux ip forwarding rule, on the netclient machine we are trying to reach. Need to make sure that machine can reach the relay server and vice versa. Otherwise, we have to verify and troubleshoot the firewall rules of that machine following the same steps.
Static WireGuard
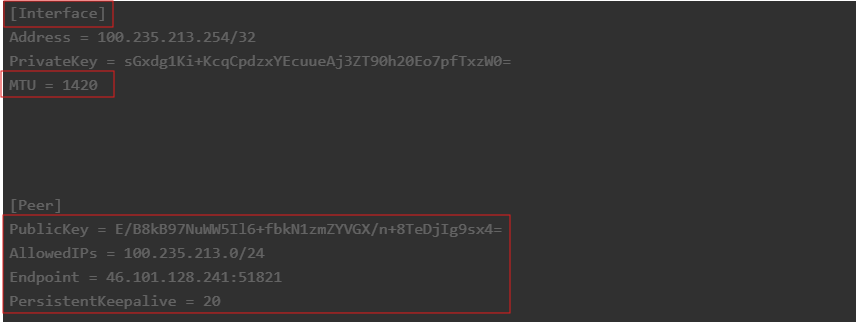
Static WireGuard connections can also be troublesome sometimes. If we have two peers but the peers are not able to reach each other, we should check if the wireguard configurations used are proper. We should verify the public/private key pairs used on both the peers. Then we should verify the endpoint address and ports on each peer configuration. Also, the allowed ip addresses range should be set properly to make sure we allow traffic in and out from those ip addresses / ranges.
If still there is no handshake between the peers, we should follow the above firewall troubleshooting steps to check if necessary ports are allowed through the device and router firewalls. If a handshake is established between the peers but ping is not reachable, we should follow the above troubleshootings steps for configuring the correct MTU size setting. We can modify the static wireguard configuration file and add “MTU = <value>” line under the [interface] tag. And then re-initiate the wireguard interface to apply the changes. Also, for peers behind NAT or any form of restrictive firewall, the persistent keepalive option must be set accordingly to keep the firewall’s NAT table up-to-date for stable connectivity.
Remote Access Gateway and Client
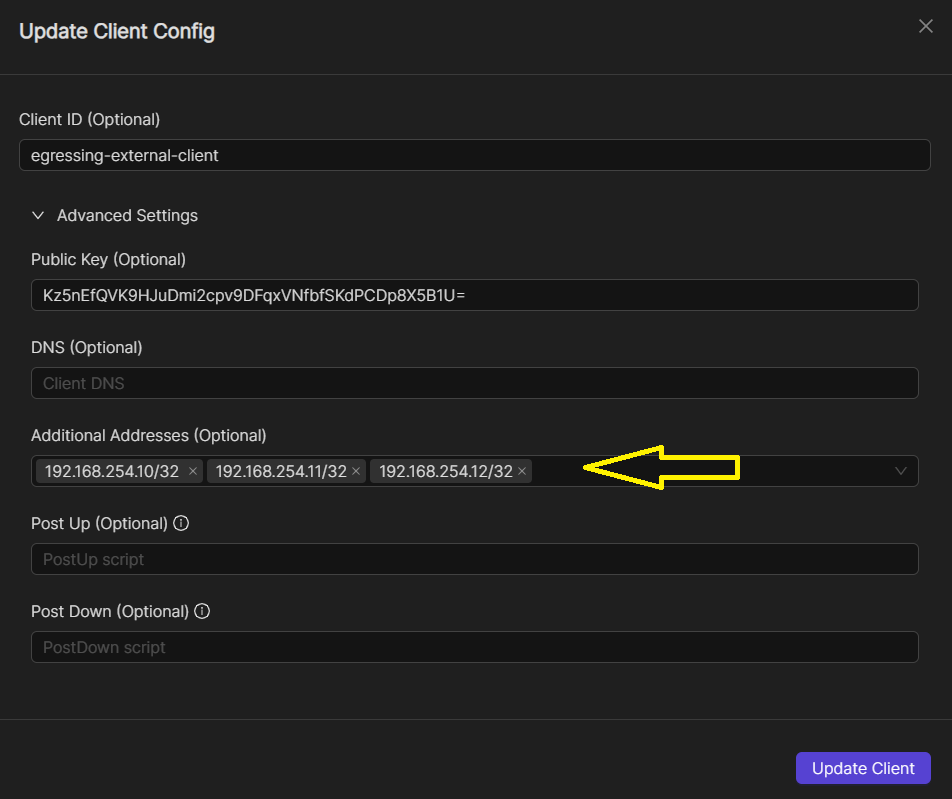
Netmaker provides “Remote Access Gateways” and “Remote Access Clients” for non netclient based devices. External clients are just static wireguard configurations which can be used to add clients which do not support netclient to the netmaker network only using wireguard. Same static wireguard and netmaker relay troubleshooting steps also apply here in case of remote access clients. If the egressing external client doesn't work, make sure to specify the address ranges on the Client Config properly while creating the “VPN Config Files”. If the external client device cannot ping the ranges specified on the client configuration we need to make sure the proper firewall is configured following the same previous steps above.
For Linux-based egressing external clients, iptables must be installed and IP forwarding must be enabled in the remote access gateway machine. In some cases we might need to add POSTROUTING rules. For instance, on Ubuntu, we get the name of the specific network interface of the egressing client that is associated with the egress ranges you've specified.
”ip a”
# add the necessary POSTROUTING rule, say the interface name is eth1
“iptables -t nat -I POSTROUTING -o eth1 -j MASQUERADE”
The remote access gateway server should show all the external clients as peers when using the command “wg”. If the peers are missing, a manual “netclient pull” should sync the configurations.
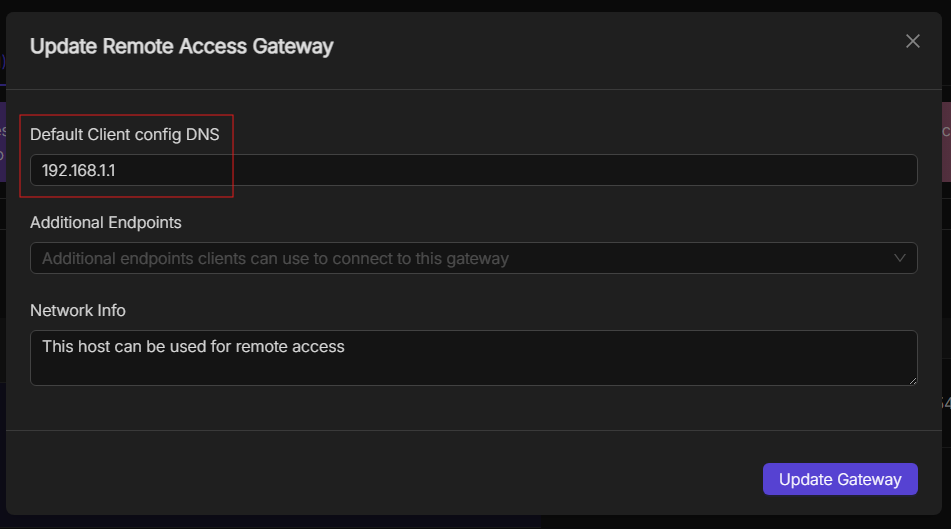
If we are trying to use domain names that are specifically set for each peer in the network, we must make sure that the DNS server for the remote access gateway server is set properly to a dns server which can resolve those domain names and addresses.
Egress
Netclient egress gateway is a feature to forward traffic to and from a specific ip address range which only the egress gateway can access directly. This feature uses WireGuard’s allowed ip ranges for routing traffic accordingly.
The "External routes" configuration in netmaker specifies the IP ranges that a peer is allowed to send and receive traffic for. It also determines which traffic should be routed through the egress gateway. Correctly setting these ranges is vital for both security and functionality.
Common Problems
No Traffic Passing Through: The peer connects to the egress gateway, but no traffic is routed through the tunnel.
Potential Causes:
-
Misconfigured "External routes" range.
-
Incorrect firewall settings.
-
Routing conflicts on the client device.
Selective Traffic Routing: Only some internal IP ranges are accessible, while others are not.
Potential Causes:
-
Incomplete "External routes" list.
-
Overlapping IP ranges causing routing issues.
-
Incorrect subnet masks.
Traffic Leaks (Non-VPN Traffic): traffic intended to go through the egress gateway is instead routed through the local network.
Potential Causes:
-
Overly restrictive or incorrect "External routes" settings.
-
Default gateway conflicts.
Solutions
Here are some common steps to troubleshoot the above issues.
1. Verify "External routes" configuration on both the peer and the egress gateway. Ensure the external routes / allowed ip ranges match the intended traffic routing policy. Use this command:
“wg show netmaker allowed-ips”

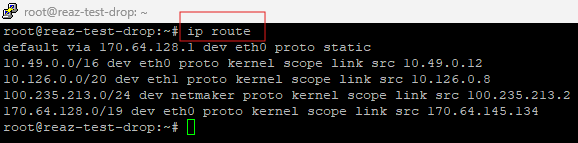
2. Check Routing Tables: On the peer, examine the routing table to see how traffic is being routed. Use command “ip route” to print the latest routing table. It also shows which routes are tied to which interfaces.
3. Test Connectivity: Ping internal IP addresses within the allowed ranges to check connectivity. Use traceroute to see the path taken by packets.
4. Analyze Firewall Rules: Review firewall settings to ensure they are not blocking traffic intended for the egress gateway. Ensure that NAT is properly configured if necessary.
5. Also, to preserve the source ip address during routing, NAT on the egress gateway must be disabled but this might introduce other problems.

If the egress range is the same ip/network as in the local network, it might cause route issues. For example, there is a local network 192.168.1.0/24, while another remote network is also setup as 192.168.1.0/24 and it's added in the egress range. In this situation, there are two routes, pointing to the same destination 192.168.1.0/24, but via a different interface/gateway (one local interface, another netmaker interface).
(As less as possible setting two private network the same address) In the situation above, it has to update the route manually.
-
Setup up different route metrics. The lower metric one is working actively.
-
If only few hosts to be egressed, please add the host ip in the egress range, rather than network address.
-
In contrast, if there are only a few hosts in the local network, but many in the remote network, it's better to setup the network address in egress range, and then add the local host in route one by one.
If another host in the same local network is setup as an egress gateway and the local network is added in the egress range, there might be conflict in the routes. For example, there are two hosts in a network, host A is setup as an egress gateway and the local network address is setup as egress range. Then on the host B, an egress route will be added. In host B's route table, there will be duplicated routes, the same destination but with different route. The active route really depends on the route metric. Changing the metric for the route on the local interface, lower than the metric number than the other one. So that the traffic is always routed via local interface (rather than netmaker interface).
Internet Gateway
Netmaker’s Internet Gateway feature works similar to the Egress feature. The only difference is that the Internet Gateway forwards all traffic of the selected hosts through the internet gateway. The allowed ips for all the selected hosts are set to 0.0.0.0/0 which tells wireguard to forward all traffic through the peer which is in this case the internet gateway. The same troubleshooting steps for the Egress mentioned above also applies to the Internet Gateways. The only difference is that the external route for internet gateways are the 0.0.0.0/0 which means all ip addresses on the global internet.
Netmaker Server
During the netmaker installation process using auto generated domain name from nip.io, the letsencrypt certificates retrieval might fail. If that happens, simply restart the caddy docker container to retry issuing of the ssl certificate using command “docker restart caddy”.

After the installation process, use command “docker ps” to verify all the 5 containers required to run the netmaker server are currently in “Up” status.

If any container have problems, try running the command “docker compose up -d” to create the containers which failed.
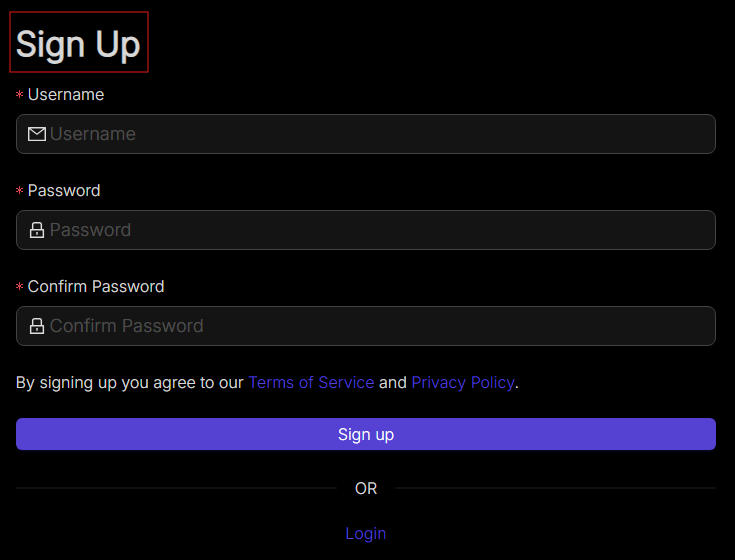
If there is a problem with the signup or login for the netmaker web ui for the first time, try resetting the whole netmaker server by using the commands “docker compose down --volumes” and “docker compose up -d”. This will delete all the netmaker server configurations and data. Now open up the dashboard url again and signup with a new admin account.
After logging into the dashboard if the ui shows mq error, there might be something wrong with the mqtt container. Restart the mqtt container using the command “docker restart mq”.
When trying to restart the netmaker server using command “docker-compose down && docker-compose up -d” encounters an error message “ERROR: Get "https://registry-1.docker.io/v2/": dial tcp: lookup registry-1.docker.io on [::1]:53: read udp [::1]:41083->[::1]:53: read: connection refused.”
This is happening because there is no domain name resolver running in your server after taking down CoreDNS via “docker-compose down”. Note that systemd-resolved was disabled when you set CoreDNS as a host (done to prevent port conflict). Sometimes you can get away with it because of some lingering nameserver cache.
st (done to prevent port conflict). Sometimes you can get away with it because of some lingering nameserver cache.
Please follow these steps in order to resolve the issue:
-
Temporarily start systemd-resolved: ”sudo systemctl start systemd-resolved.service”
-
Start the netmaker server: ”docker-compose up -d”
-
Stop and disable the systemd-resolved, again: ”sudo systemctl stop systemd-resolved.service && sudo systemctl disable systemd-resolved.service”