3. Configure Traffic Flow
Getting Traffic Into, Out Of, and Between Devices in your Network
Overview
Netmaker allows you to shape the way traffic routes into, out of, and between devices in the network. Here, we’ll show you some of these settings, depending on the type of network you wish to create.
Here is a quick overview of the routing features you may wish to use:
Into the Network
Remote Access Gateway: This was discussed in the previous section for generating static WireGuard config files. It is also how Users are granted access to the network, so at least one Remote Access Gateway must be deployed for user access.
Between Devices
Failover Node: A failover node is a device that will automatically route traffic between other devices if it detects that traffic is not flowing correctly.
Relay Node: A relay is a device that is set to always route traffic to and from a specified device. This should be used when a device is deployed in a very restrictive, unreliable, or roaming environment, ensuring it remains reachable at all times.
ACL Rules: ACL rules can be configured to specify which devices are allowed to communicate with one another. You simply enable or disable access between specific devices in the network.
Out of the Network
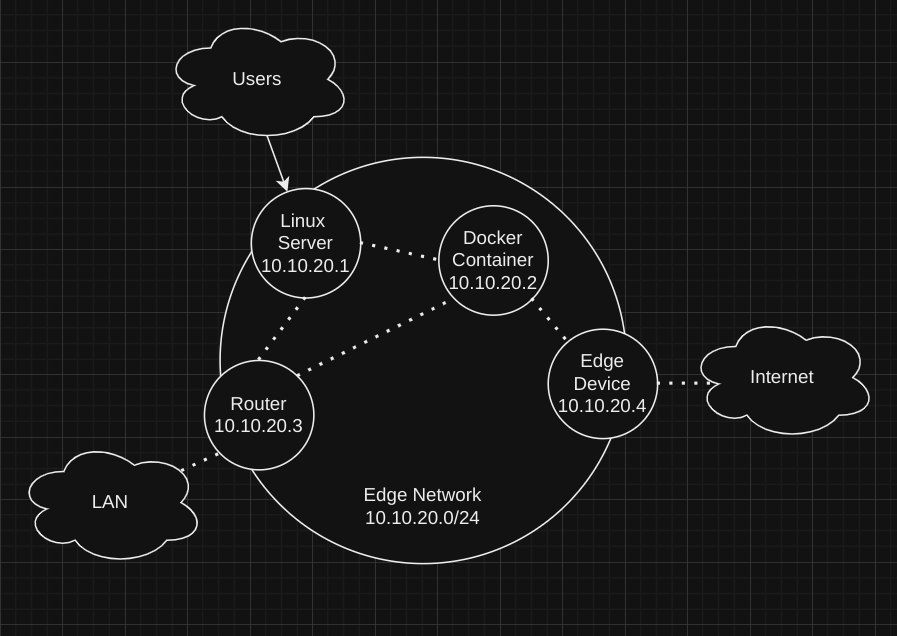
Egress Gateway: An Egress Gateway is a device that routes traffic to a local network or specific IPs outside of the VPN, such as a LAN, VPC, or IoT devices on an edge network.
Internet Gateway: An Internet Gateway is a device that routes all traffic from specified devices. It acts as a “full tunnel” VPN for the selected devices.
Remote Access Gateway: As noted in the previous section, when defining a config file, you can specify Additional Addresses outside the VPN. The Remote Access Gateway will route traffic to the client, which is then responsible for forwarding the traffic to the specified address ranges.
Review this list and determine which configurations you want to set up, then proceed to the corresponding section for instructions on how to implement them.Into the Network
Gateways
For users to reach the network, a Gateway must be defined.

Gateways will forward traffic from user devices into the network. Any Linux device (e.g. a netclient running on Linux or Docker) can act as a Gateway.
The Gateway should have a public endpoint that is not behind a NAT.
Default Gateway
Your Netmaker server will deploy a device that can act as a Gateway by default. In simple scenarios, we recommend using this device. It will be the first device you see in your Network, before you add any others.
There are a couple of reasons to use other devices as gateways:
-
Multiple gateways to segment traffic
-
Proximity to target devices, to decrease latency
If either of these apply to you, you can follow these steps.
1. Deploy a node
Deploy a node using the previously mentioned steps for the Netclient. Reminder that this should be an easily reachable device. It should not be behind NAT or strict firewall. If it is, you will need to make sure port forwarding is set up correctly.
2. Set as Gateway
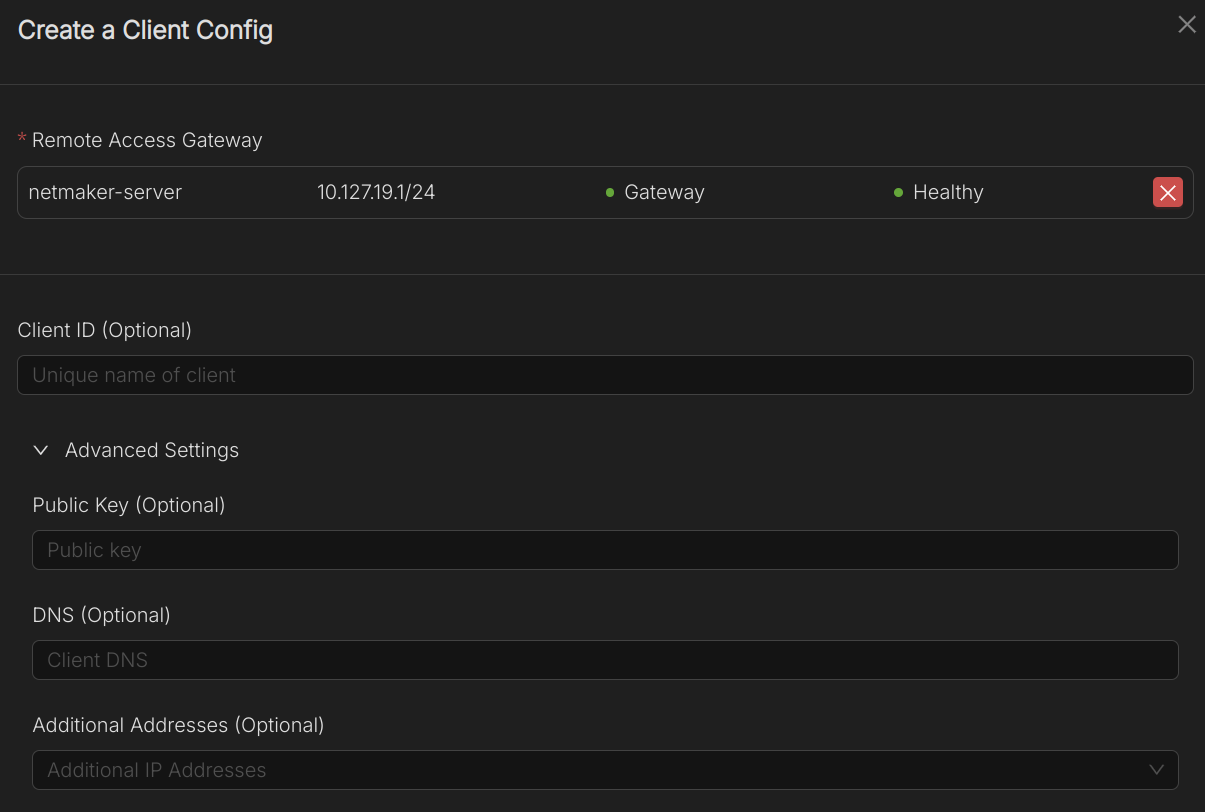
Go to the “Gateways” interface of your network, click “Create Gateway” and select the device. There are some optional parameters which you may want to configure here:

Starting from version v0.90.0, gateway DNS configuration is now managed from the Name-Servers page.
Default client DNS: The DNS settings that will be applied to clients using the gateway IP. There are three common DNS servers you may wish to use:
-
Local Network Access: If using the VPN to access a local network (typically via Egress Gateway), you may wish to set this to a local DNS server that is reachable over the network. EX: 192.168.1.53
-
Internet Access: If using the VPN to access the internet (via Internet Gateway), you may wish to set this to a public DNS server like 8.8.8.8 or 1.1.1.1
-
VPN Access: If using the VPN to access only VPN resources (devices), you may wish to set this to the server endpoint on the VPN (e.x. 10.10.10.1). There is a CoreDNS server running on the Netmaker Server, which makes all private DNS names available.
Network Info: This will be displayed to users using the Remote Access Client, and is meant as a helpful description of the VPN for users. EX: “Remote Access VPN for Office Network. Database can be reached at 192.168.25.54”
Relay Configuration
Adding Relayed Nodes
-
Navigate to the Connected Nodes tab of your created Gateway.

-
Click Add Connected Node and select the node that requires relaying.

-
The selected node will now route its traffic through the gateway.

Auto Relays Option
When adding a new node to the network, you can pre-configure it as a relayed node by generating an enrolment key and specifying the Gateway and network.
Between Devices
Failover Server
The failover server will route traffic between nodes when it detects that peer-to-peer is not working.
For a new network, on the Nodes interface, ther will be a warning message:
“There's no failover node present in the network. Set one for redundancy, in case of failure.”
Click “Set Failover Node” to set a node as the Failover for the network.
This should be a machine that is not in a private environment which is easily reached by all nodes in the network.

ACL Rules
Access Controls specify what devices have access to what other devices within a network. In many cases, you may wish to just segment traffic with multiple networks. But sometimes, it may make more sense to manage this within a single network using Access Controls. For example:
Multiple Remote Access Gateways with Different Access Levels
You can deploy multiple Remote Access Gateways within a single network, which have access to different resources within that network. One could have access to devices A, B, and C, while another has access to A, D, and E.
Egress to Different Environments and/or overlapping Egress Ranges
Typically, you cannot deploy multiple egress gateways within a single network which route to the same IP ranges. If you do this, the netclient will not know which one to send it to! However, if you use access controls, you can specify that device A is connected to Egress A, and device B is connected to Egress B, which resolves the issue.
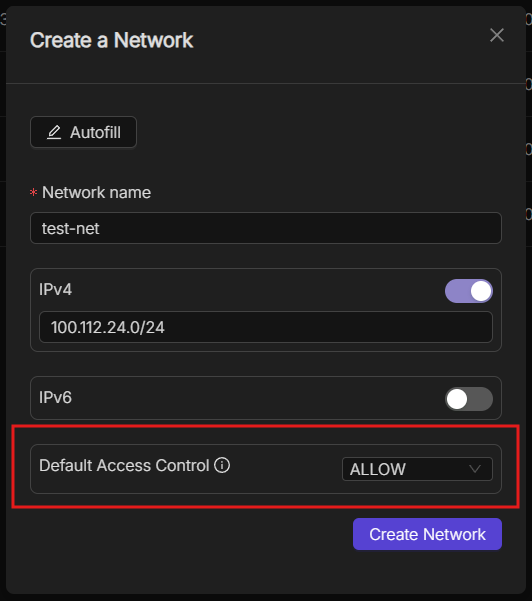
Default Access Controls
There are Default Access Controls for both Networks and devices. A default of ALLOW means all devices are reachable by default. A default of DENY means no devices are reachable by default
Network Level: Setting the default to ALLOW or DENY on the network will apply this rule to all devices who join the network. E.g. If you set the default to DENY, all devices will have a default of DENY, meaning no devices can reach each other, and you must manually enable all connections using ACLs.
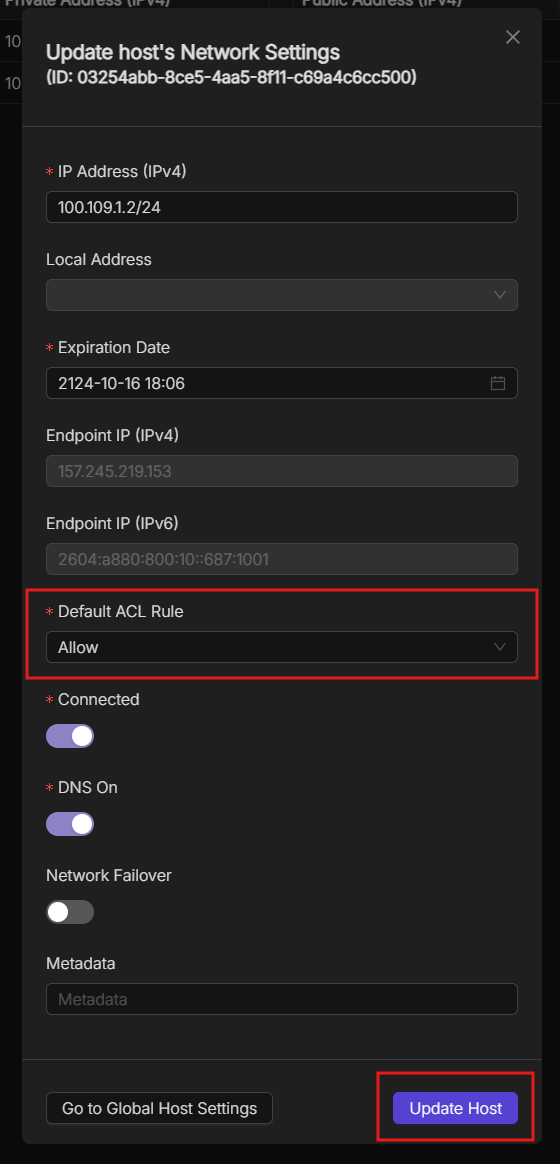
Device Level: You can change the default ACL policy on any Device within the Network to differ from the network policy. This can be useful, for example, when creating a network where only one device should be accessible by default. To do this, set the network’s ACL policy to DENY, and set the accessible device’s default policy to ALLOW. Then, as devices join the network, they will only have access to this single device by default, unless otherwise granted using ACLs.
The network’s default ACL must be set during creation and cannot be modified. To modify a device’s default ACL, go to the device’s settings in the Nodes interface of your network, edit, and modify the ACL policy.
Setting Access Controls
To set ACLs for the network between any nodes, simply go to the Access Control interface of your network. Select and de-select the connections which should be allowed, and then apply them.

Out of the Network
Egress Route
Egress Gateways forward traffic to specified IP addresses and ranges in a remote network outside of the VPN. EX: an office LAN, a cloud VPC, or an edge site.

Egress Gateways must be run on a Linux device or Docker, and must have access to the network you wish to forward (e.g. deploy inside the office network, VPC, etc).
To configure, go to the Egress interface, click create, and specify the node. Then, add ranges to the new Egress Gateway. This can be specific IP addresses, or full subnets.
The device will begin forwarding traffic from the VPN network to the specified ranges automatically.
Helpful Hint: Egress Gateways can also be used to configure access from a site. For instance, if an Egress Gateway is configured to push traffic to a LAN of 192.168.1.0/24, you can have devices in the LAN send traffic over the Egress Gateway into the VPN. However, you must configure the site so that local devices know to push VPN traffic via the local IP of the egress gateway. EX: If your VPN is 10.10.10.0/24, and your egress is deployed locally at 192.168.1.25, the local devices should have a route to send 10.10.10.0/24 via 192.168.1.25.
Internet Gateway
An Internet Gateway acts as a full tunnel VPN for specified devices, meaning all device traffic will go through the Gateway.
If a Gateway is connected to an Internet Gateway, all generated WireGuard clients will also send their internet traffic via the gateway.
An Internet Gateway must be configured on a device running Linux or Docker.
Gateway
The Gateway will forward traffic to VPN Clients defined on the gateway. When creating a Client, you can specify “Additional Addresses”, which acts similarly to an Egress Gateway.
For example, if you have a router on a site with a subnet of 192.168.1.0/24, you can create a config file, and add “Additional Addresses” of 192.168.1.0/24. This address range will be advertised to the VPN network.
When you apply the configuration on the Router, you must add the appropriate NAT rules to forward traffic to the local network. Then, your Router will act as an “Egress” from the VPN to the local network.
Next Steps
Assuming you have at least one Gateway configured for your network, we can go on to configuring User Access to the network.