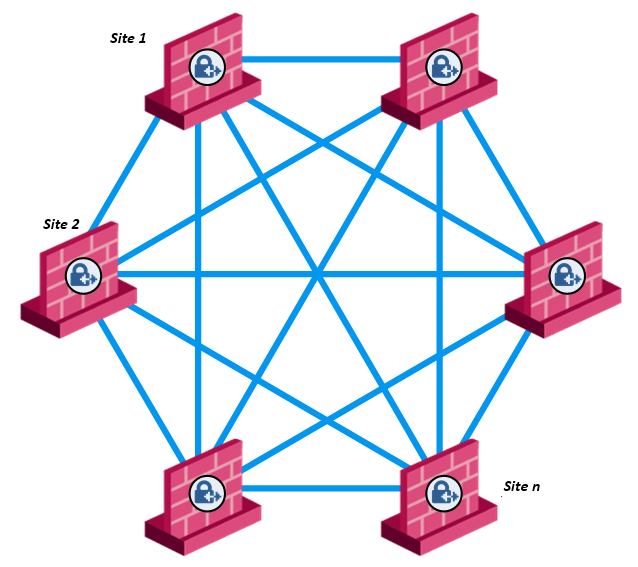
How to Setup a Full Mesh Site-to-Site VPN with Netmaker
“I have three sites: a data center, an office, and an edge location. I want network resources at each site to access network resources at the other sites without having to install a software client on every machine in each location.” – Netmaker User
If you have a similar use case, this guide is for you. While it is sleek to install Netclient or the Remote Access Gateway (RAC) on every machine in your network for seamless end-to-end encrypted traffic, there are cases where that might not be ideal or even possible. Fortunately, Netmaker is fully capable of enabling the interconnection of various network types across different sites via a secure full mesh Virtual Private Network (VPN). This allows encrypted Layer 3 (L3) network communication among different sites.
Guide Overview
In this guide we’re going to create full mesh site-to-site VPN for a multinational corporation. Our job is to establish a secure and scalable virtual network infrastructure that connects corporate headquarters with regional branches and remote offices to support the distributed nature of its IT system. This infrastructure combines cloud computing with on-premise servers, allowing for both centralized control and localized operations where needed.
Implementation Methods
Netmaker provides flexibility in implementation based on how networks are configured. While uniform deployment across all sites may be ideal, this guide will demonstrate four practical methods of interconnecting sites. For simplicity of this guide, the final result will be a full mesh site-to-site VPN setup across four crucial subsidiary sites of the corporation.
The first site is the corporate cloud infrastructure. It has front-facing servers and services as well as backend servers. It is hosted in a Virtual Private Cloud (VPC) network.
The second site is a branch network behind an OpenWRT router capable of running Netclient. It has on-premise servers that support local and distributed operations as well as a good number of workstations and network devices.
The third and fourth sites are remote offices behind NAT routers that are not capable of running Netclient. In addition to workstations, these offices also have on-premise servers that support local and distributed operations.
We will begin by interconnecting the first two sites and then expand from there.
Initial Setup
Since we are not installing VPN software on every machine, it is essential to ensure that the sites and the Netmaker network do not have overlapping address ranges. For example, connecting two sites that both use the 192.168.1.0/24 network will not work. Similarly, connecting a site using the 192.168.1.0/24 network to another using the 192.168.0.0/16 network will cause issues. This rule also applies to Virtual LANs (VLANs).
In this guide, we will use the following address spaces:
-
Netmaker Network:
100.100.0.0/16 -
Site 1 (VPC Network):
10.124.0.0/20 -
Site 2 (Behind OpenWRT with Netclient):
172.16.0.0/16 -
Site 3 (Behind NAT Router without Netclient):
192.168.123.0/24 -
Site 4 (Behind NAT Router without Netclient):
192.168.111.0/24
As you can see, there is no overlap between the network spaces above.
This guide assumes you have access to your Netmaker server. Let's start by creating the Netmaker network that will interconnect all these networks across the sites. We will name it "site-to-site-mesh-vpn". For added functionality, we will create a dual-stack network.

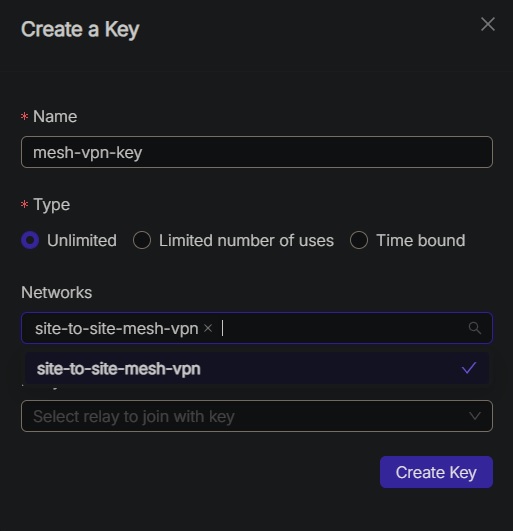
Next, create an enrollment key for the network to allow machines to join. We will call it "mesh-vpn-key".
Now that we have everything set up, we can proceed with interconnecting the first two sites.
Interconnecting Site 1 and Site 2
As mentioned, Site 1 is hosted in a VPC Network without a router. It is common to have VPC networks without gateways or routers to centralize internet traffic. This setup typically includes public-facing web servers as well as backend servers without public addresses.
Since the corporation is running a distributed IT system, it is necessary for some of their servers and services hosted in the cloud to initiate connection with the other servers located in different sites, hence a two-way communication.
In this scenario, a virtual machine installed with Netclient is necessary to function as the secure tunnel gateway or secure tunnel router to the other sites. In Netmaker, the Egress Gateway feature handles encrypted traffic going out from different sites into, in this case, the VPC network. And then for outgoing traffic, we are going to setup routing either on the initiating devices or on the VPC’s routing feature. More on this later in the “Set Up Routes in Site 1’s VPC Network“ section.
While using one of the existing web server in the VPC as the Egress Gateway is an option, in this scenario we will use a dedicated Ubuntu server machine.

The second site is a branch network behind an OpenWRT router capable of running Netclient. It has on-premise servers that support local and distributed operations as well as a good number of workstations and network devices.
Site 2 is a corporate branch private network behind an OpenWRT router. Since OpenWRT is a Linux machine, WireGuard is merged into its kernel. When configured responsibly, the router is capable of safely running Netclient. We will use it as the tunnel gateway to the VPN for Site 2.
By then end of this section, we should have a VPN setup depicted in the image below.
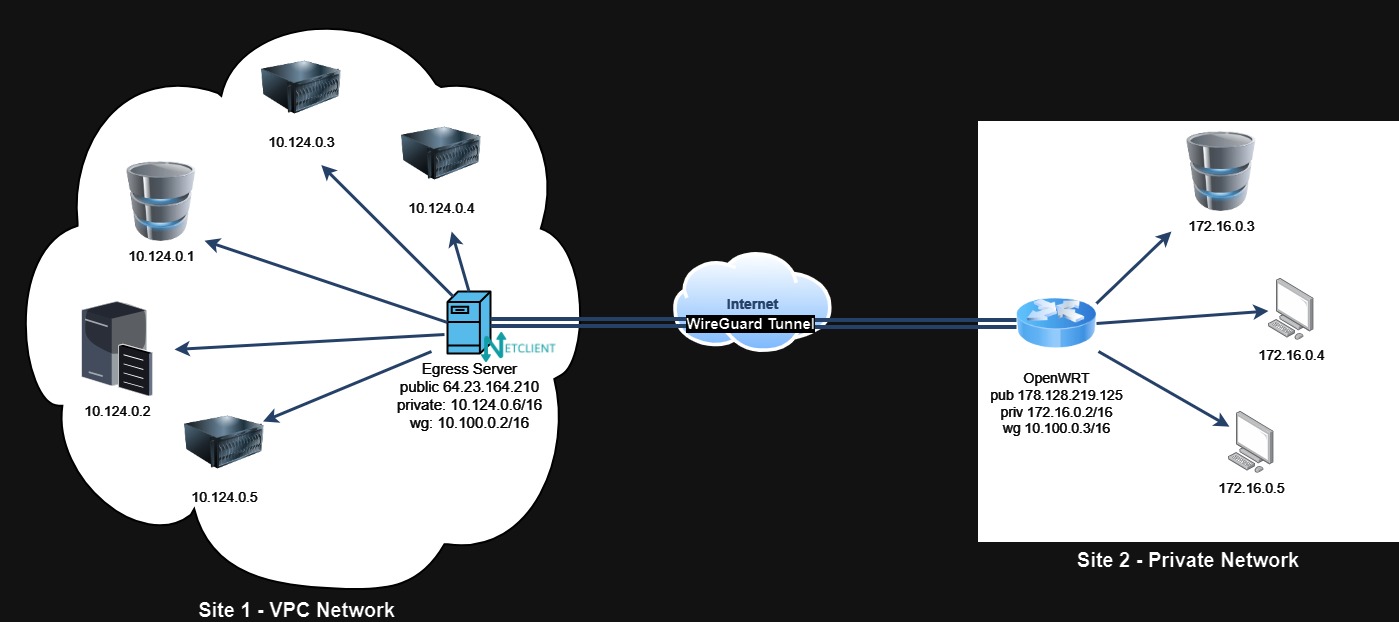
This connection will allow hosts in Site 1 to connect to hosts in Site 2, and vice versa, as if they were in adjacent LAN.
Here are the steps:
-
Install and setup Netclient.
-
Set the Netclient machines as Egress Gateways.
-
Set up routes in Site 1’s VPC Network.
Install and Setup Netclient
We only need to install Netclient on the VPN tunnel gateway at each site, not on every device in the network. For Site 1, we will install Netclient on a public facing Ubuntu machine.
Netclient by default uses UDP port 51821. It is important to allow inbound and outbound rules for UDP 51821 on your cloud firewall if you have any. Please refer to your cloud provider’s documentation on how to do this.
To install Netclient on the Ubuntu machine follow the steps below:
-
After logging in to Netmaker server, go to the network we just created ("site-to-site-mesh-vpn"),click on the "Add Nodes" butto, and click "Add New Device".
-
Choose the platform and architecture (e.g., Linux AMD64). Copy the installation command and execute it on your machine. After installation, copy the command to join to the Netmaker VPN network and execute it on the Ubuntu machine. Click Finish to close the modal.

After a short while, the machine should appear as one of the hosts, similar to the image below.
For Site 2, we need to install Netclient on OpenWRT. For instructions on how to install Netclient on OpenWRT and how to configure it, refer to the "How to Run Netclient On OpenWRT" guide. Joining OpenWRT to the Netmaker network will be similar to the steps described above.
When you configure the Firewall Zone on OpenWRT, specify “LAN zone” in the “Allow forward to destination zones“ and “Allow forward from source zones” combobox fields. This is essential for site-to-site mesh VPN scenario.

We should have the the machines appear as Devices in our “site-to-site-mesh-vpn” network.

Set the Machines as Egress Gateways
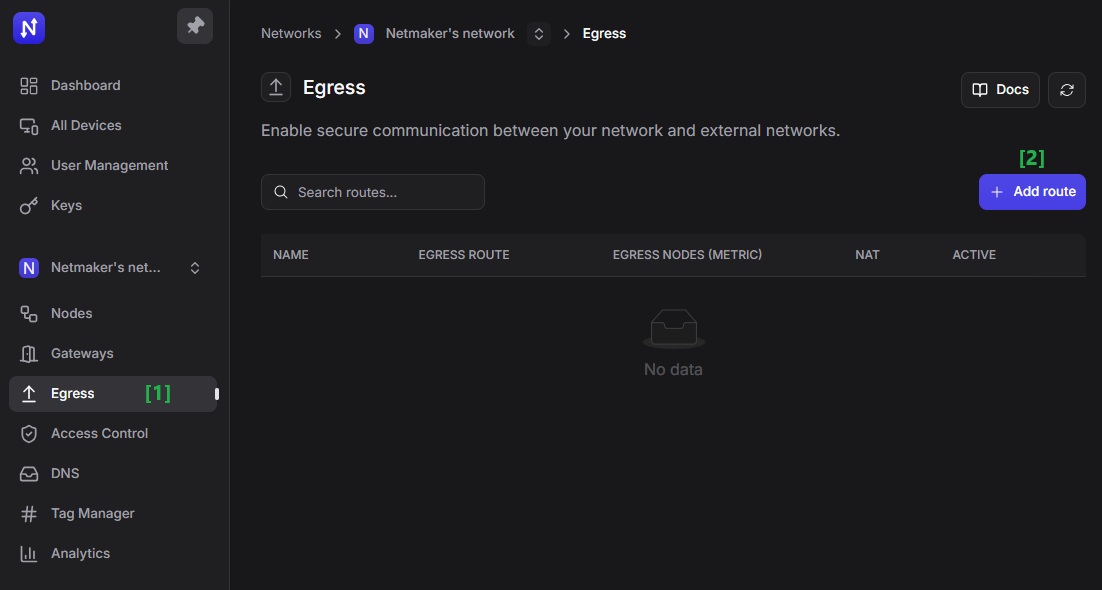
With each site’s gateway now part of the "site-to-site-mesh-vpn" network, we’re going to proceed to configure them as Egress Gateways. Go to the Egress page and click "Add Route".
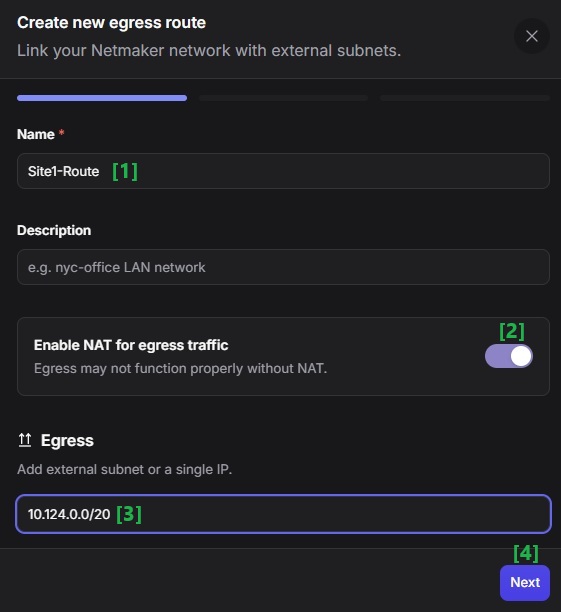
In the modal form, provide a descriptive name. Then leave the "Enable NAT for egress traffic" option enabled to allow traffic from other sites to reach internal devices in the VPC, more on this later in the “Disabling NAT for Egress Traffic“ section. For now, click "Next" once you’re done.
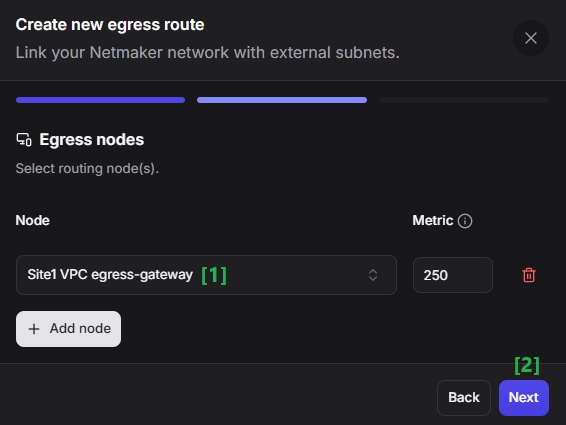
Select Site 1’s Egress Gateway machine then click Next.
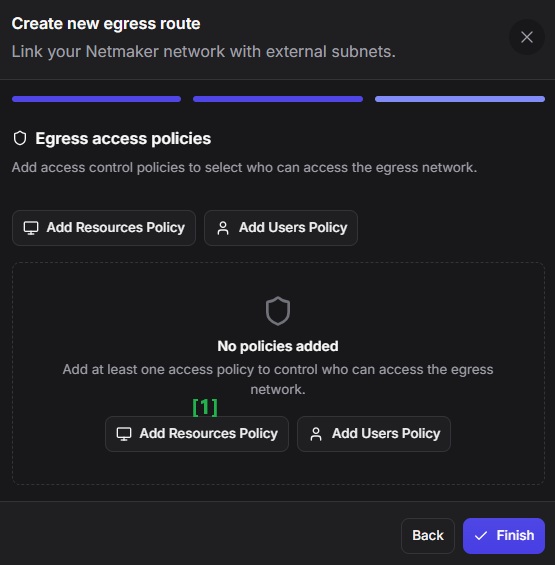
Set an access policy for the egress route. For now we’re just going to create a policy that would enable all the nodes in the network to reach remote site. Click on the `Add Resources Policy` button.
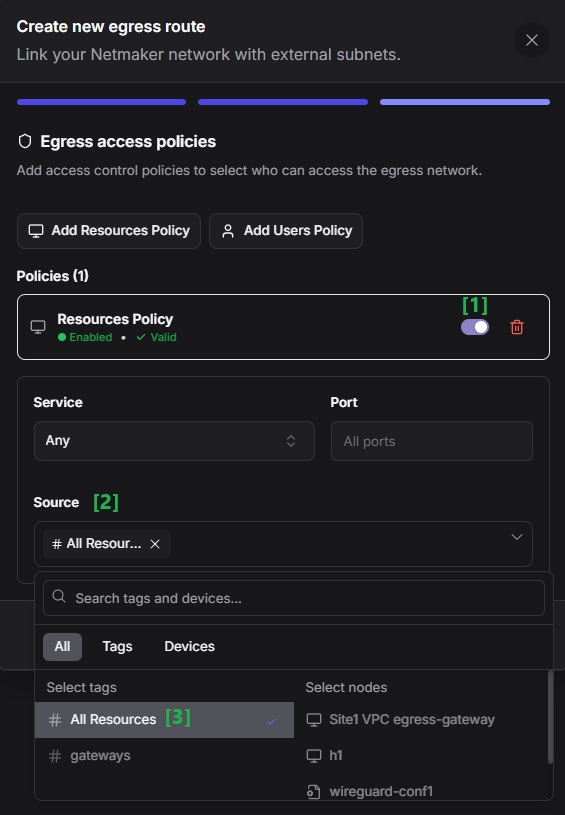
Leave the enable switch for the policy. Then in the Source field, select All Resources. And then click Finish.
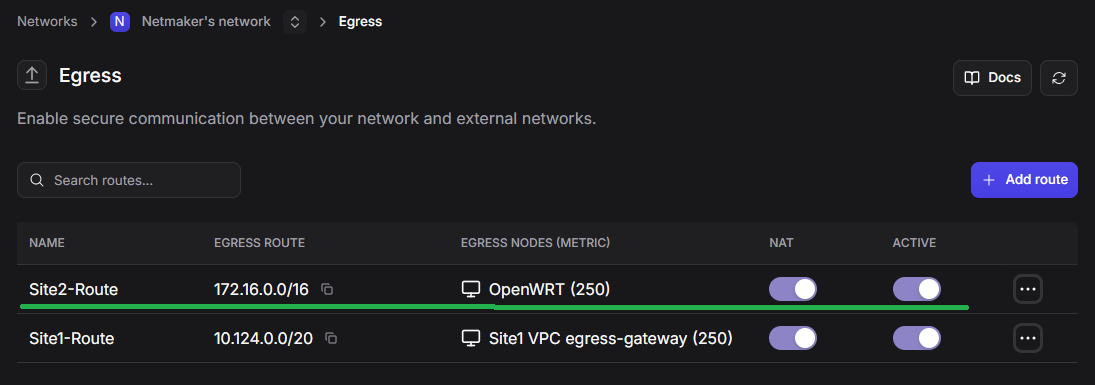
You should see the newly created route in the table where you can double check its route, gateway node, and enabled NAT; and also that it is active.
Go to the Access Control page and you should see the newly created access policy for the egress range.
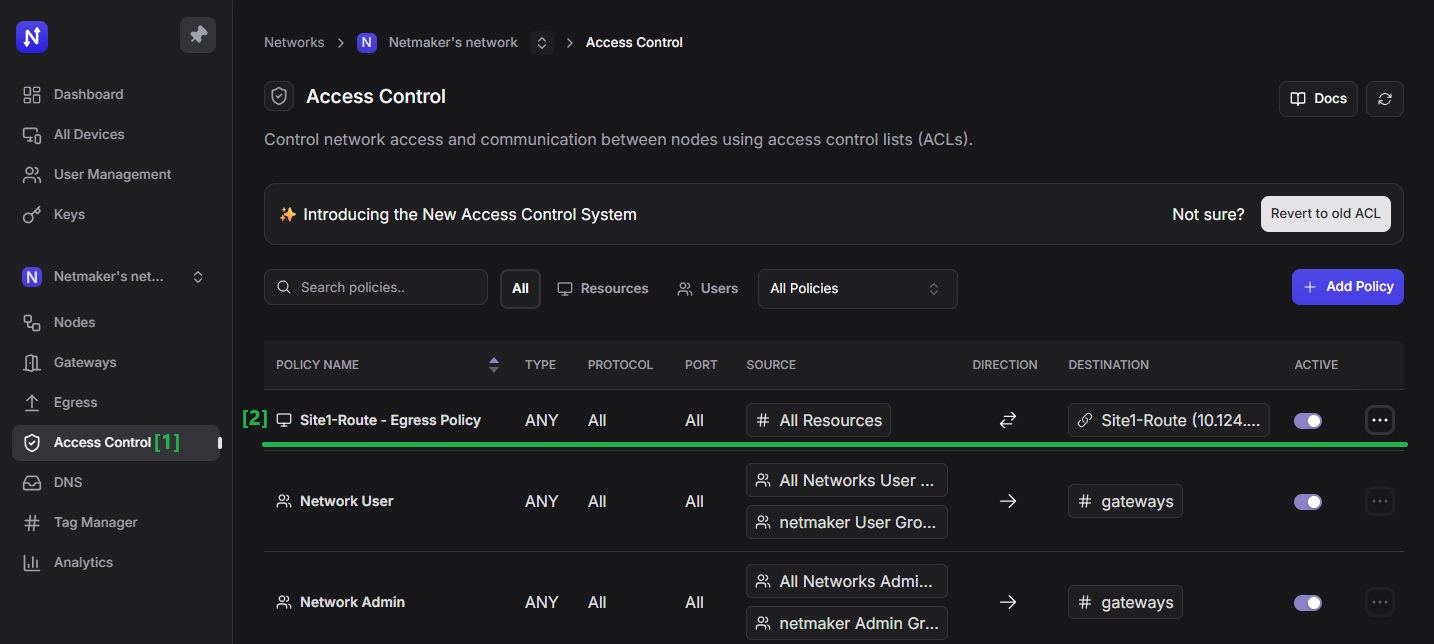
We’ve added a route to the whole network(10.124.0.0/20), but it is also possible to expose specific address ranges (10.124.0.0/24), or individual devices. For instance, if you only want to expose the Database Server (10.124.0.1), File Server (10.124.0.2), and Web Server 3 (10.124.0.5), add three egress routes just like what we did, and specify these three CIDRs for each route record: 10.124.0.1/32, 10.124.0.2/32, and 10.124.0.5/32.

At this moment, all of Site 2’s machines should be able to reach the machines in Site 1 albeit limited only to the external ranges we’ve specified. The traffic, however, is not two way. Site 1’s machines cannot reach any machines in Site 2 because we haven’t configured Site 2’s OpenWRT router as an Egress Gateway just yet.
We can configure Site 2, similarly, by adding OpenWRT as the Egress Gateway and exposing a subset or the entire network.
At this moment, Site 1’s Egress Gateway machine should now be able to reach all machines in Site 2. But other machines in Site 1 still cannot reach machines in Site 2.
You maybe wondering why Site 2’s machines can reach Site 1’s but not the other way around? This is because Site 2’s OpenWRT is functioning not only as the tunnel gateway but also as the physical gateway of the local network. Machines in Site 2 points to OpenWRT as the default gateway. All traffic destined to another network goes through it. While on the other hand, Site 1’s machines do not point to Site 1’s Egress Gateway machine as the default gateway. Thus the necessity to setup static routes on Site 1.
Set Up Routes in Site 1’s VPC Network
Setting up static routes for secure site-to-site connectivity in VPCs can vary depending on the capabilities provided by your cloud provider. For example, Amazon allows you to set global route tables on your VPC that is independent of the virtual machines, whereas DigitalOcean by default does not.
Generally, these static routes must be added destined to the local network IP address of the machine that is functioning as tunnel gateway:
-
routes to each remote site (e.g., Site 2’s
172.16.0.0/16network). -
route to the Netmaker VPN network (optional,
100.100.0.0/16). -
and routes to any other egress external client address ranges (optional).
These routes must be maintained, because any changes to the Netmaker VPN settings will require corresponding updates to the routing table.
As already stated, depending on your VPC provider you can add these static routes either by:
-
the VPC’s global routing table, if your VPC provider supports it
-
or to each virtual machines’ routing table
Adding routes at the VPC level is the simplest in terms of management and control. Manually adding static routes on each machine can be tedious but a viable option nonetheless.
For this demonstration, we will add a static route on the File Server, which runs Ubuntu. While there are multiple ways to permanently add static routes in Linux, we will use netplan for simplicity.
Edit the default netplan YAML file, typically located at /etc/netplan/<your-machine-default-config>.yml. Add a route entry to the local network interface (e.g., eth1). Under ‘routes,’ specify the network address of the remote site. For example, route all traffic destined for Site 2’s 172.16.0.0/16 network via the Egress Gateway at 10.124.0.6.

Some VPC providers like Google Cloud controls the default netplan configuration of their virtual machines. Any changes you make are temporary and are going to be lost anytime. Please refer to your cloud provider’s documentation for information on how to effectively and permanently add static routes to your VMs.
We can add the same route to the other machines in Site 1 as well.
As to Site 2, there’s no need to add static routes because the OpenWRT router itself is already the default gateway of all the user stations and servers behind it.
And that’s it. Devices from Site 1, those that have static routes pointing to the tunnel gateway, should now be able to reach devices from Site 2 and vice versa.
Disabling NAT for Egress Traffic
You might have noticed that we’ve enabled NAT for egress traffic earlier. This is Masquerade NAT and is used to allow your private network to hide behind, as well as be represented by, the address bound to the public interface, which in this scenario is the Egress Gateway’s IP. While this is useful in most cases, the caveat is that when traffic reaches its destination, the Egress Gateway’s IP is registered as the source IP instead of the machine’s IP that initiated the traffic in the first place.
This can cause complication when you want to identify source traffic by using a few deterministic IP addresses so that you can establish IP-based security measures, like allowlisting policies.
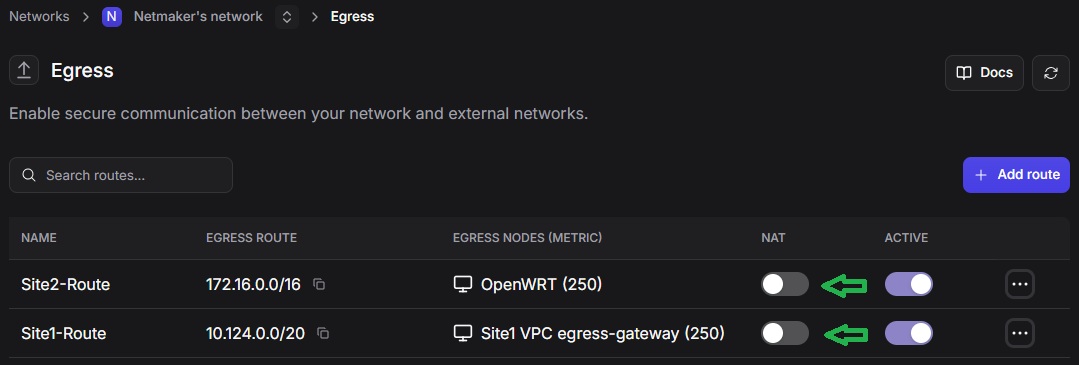
If this is your case, you may have to disable NAT for egress traffic on the Egress Gateways, on both Site 1 and Site 2.
The only drawback if you do this is that not all machines in Site 1 are reachable from Site 2, unless you set the static routes globally, or on the VPC level. Otherwise only those machines in Site 1 that have static routes configured on them are reachable from Site 2.
Site-to-Site IPv4 Over IPv6 Tunnel
A site-to-site IPv4 over IPv6 tunnel allows isolated IPv4 networks to communicate with each other through an IPv6 network. This is achieved by encapsulating IPv4 packets within IPv6 packets for transmission over the IPv6 infrastructure. As of Netmaker v0.99.0, this feature has been supported.
While this guide can also be applied to this scenario, there is an additional configuration on OpenWRT in order to achieve seamless two-way communication.
Go to Firewall - NAT Rules and then add a rule. Make sure to set ACCEPT - Disable address rewrite.
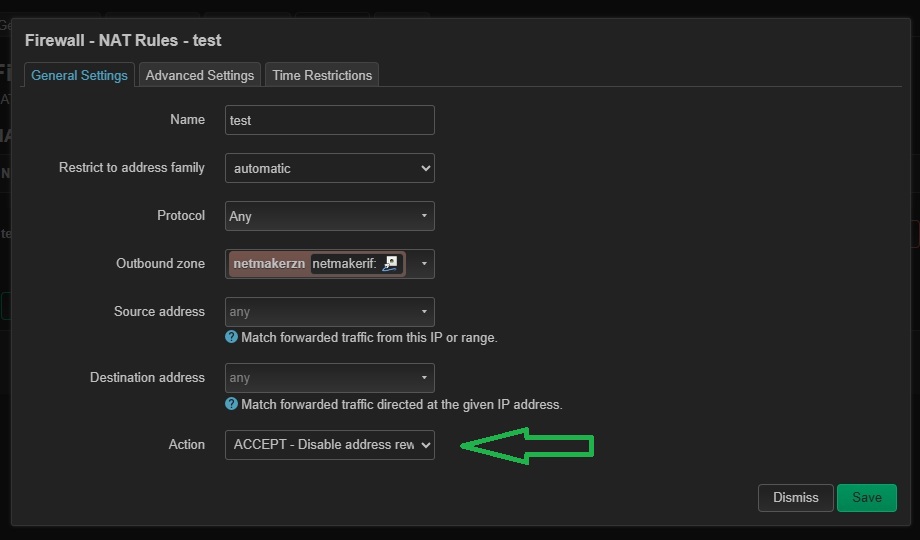
Click on Save to create the rule and then Apply the changes.
More to come
Stay tuned for more methods which we’re going to employ to interconnect Sites 3 and 4, soon.