Network Setup
Overview
Creating Networks in Netmaker is a very simple process. You need at least one network for your devices, and in many cases, you will want multiple networks. In this short guide, we discuss what a Network is, when to use multiple networks, how to create networks, and your network configuration options.
What is a Network in Netmaker?
Simply put, a Network in Netmaker is a virtual private network, or VPN. You could also refer to it as a “Virtual Subnet” or “Virtual Network”. In it, you will configure access to devices, internal and external to the VPN. So it is a logical container, or grouping, of your devices and users, that segment their access.

A network in Netmaker has a defined subnet (or subnets, if using both ipv4 and ipv6). All devices enrolled in the network, both Clients and Hosts, will be assigned a virtual IP Address from this range, which is the private IP address over which encrypted traffic and communications occur between devices.
Network Settings
Network settings are immutable. This is important to know when you create a network! If you want to change your network settings, you will need to delete and create a new one. Why? Because network properties are fundamental to the functioning of the network, and changing these settings could cause all sorts of disruptions. Luckily, there are only a few network settings to keep track of:
Network Name
The identifier of the network. Typically will be the environment, use case, or customer name (for B2B use cases). For example, if providing remote access to an office network, consider naming the network “myoffice-1”
IPv4, IPv6 CIDRs
This is the virtual IP range(s) of the network. Typically, we recommend just using IPv4, unless you have a strong need for private IPv6 addresses. Note that these are just the private addresses assigned to the machines, and have nothing to do with the public addresses over which the machines reach each other. Devices can still use their ipv6 endpoints to communicate, even if the virtual network is ipv4.
You do, of course, need to specify a network size that is suitable for your network. For example:
10.10.10.0/24 - A /24 network. Will be able to include up to 254 distinct private IPs, meaning if you plan to include more than 254 machines in your private network, it will not be big enough.
10.10.0.0/16 - A /16 network. Will be able to include up to 65,534 distinct private IPs.
The slash is known as the “subnet mask.” See here for a description of various subnet masks and how many addresses they provide: https://www.freecodecamp.org/news/subnet-cheat-sheet-24-subnet-mask-30-26-27-29-and-other-ip-address-cidr-network-references/
Important Notes on the Address Range
-
The subnet you specify should be in the private address space. Otherwise, it may conflict with public (real world) IPs: https://www.iana.org/help/private-addresses
-
The range specified should not conflict with any local addresses that your machines may have. For instance, a local area network (e.g. your home network) will often have an address space starting with 192.168.*.*, so this should be avoided. Many (such as AWS EC2 instances) use the prefix 172.*. This is why typically, we use a private subnet with a prefix of 10.*.
Default Access Control
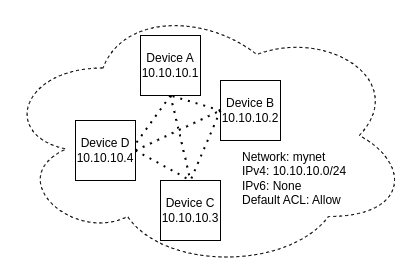
This should almost always be set to “ALLOW”. The Default Access Control is the setting that Hosts are given for reachability.
If it is set to “ALLOW”: All machines in the network can reach all other machines in the network by default. A network administrator can optionally disable connections in the “Access Controls” tab of network management.
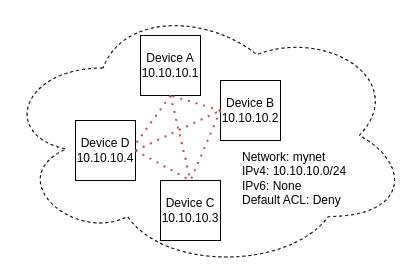
If it is set to “DENY”: No machines will be able to reach each other by default. Any machine added to the network will have no connections. A network administrator must specify which machines can reach each other in the “Access Controls” tab of network management.
The Default Network
When you deploy Netmaker on-prem from the quick install script, or sign up for the SaaS, a network will be available by default with the following properties:
Name: netmaker
Subnet (ipv4): 10.*.*.*/24
Subnet (ipv6): ::*:*::/64
Default ACL: ALLOW
Note that the specific IP ranges are randomized.
This is suitable for most standard use cases where only one network is required, and is provided to accelerate the setup process. For simple use cases, this should be all you need. However, it can be deleted if you wish to set your settings differently.
You may also a secondary network called internet-access. This is meant as a demonstration of how to use Netmaker as a full-tunnel internet VPN, without having to do anything other than install the Remote Access Client locally. This network can be deleted if desired.
How Many Networks Do You Need?
Planning out your Netmaker setup requires making a determination of how many Networks you will use in your setup. There are a few reasons you might want multiple networks. The main thing to keep in mind is each network acts as a different VPN, and hosts (devices added via Netclient) can be a part of multiple networks simultaneously.
You Manage Multiple Customers
If you are an IT Services company that works with multiple customers, you may wish to manage access to or from customer environments in one platform. Setting up multiple networks is an easy way to do this. You can of course also deploy multiple “tenants” as described in the Server Deployment guide, but keeping everything on one server will be simpler for some use cases. In such a case, simply create one network per customer.
You Have Multiple Environments or Use Cases
If you have multiple offices, clouds, testing environments, or just have vastly different use cases (e.g. remote access to office vs. allowing IoT devices to reach your cloud environment), you may want to manage these via different networks.
You Want to Segment Access
If you have vastly different levels of access between user or machine groups, it may be easier to manage segmenting this access using multiple networks. This can also be done within a single network, but using multiple networks is sometimes cleaner and easier to manage.
Creating Networks
Once you have determined how many networks you need, making them is easy. Simply go to the Dashboard interface and click “Create Network”:

If you are unsure, or don’t care, about the subnets, you can simply “Autofill” the settings, which is fine for most users. However, take care to choose a network name that matches the use case. For instance, if setting up remote access to a customer’s environment, consider naming it <company name>.
Next Steps
Once you’ve created your Network(s), it’s time to add the devices that will make up your network. We’ll discuss that in the next section.