Deploying the Netclient
Overview
You have configured your Netmaker server and created a network (or networks). You have determined the layout of your network, and which devices will serve various functions within the network. Now, it is time to add and configure these devices.

This section covers adding the Netclient to your network, which make up endpoints of your network infrastructure, serve as hubs for traffic, and route traffic to external environments.
Endpoints: Typically servers, which you want to reach directly, or which need a direct connection to the network. Examples: A jump server, a database server, edge servers.
Hubs: Dedicated endpoints, which route traffic between endpoints in the network. For instance, a Remote Access Gateway, which routes traffic to and from Static WireGuard Config files, and the RAC. The Relay, which routes traffic to and from other netclients.
Forwarders: Dedicated endpoints, which route traffic out of the network to an external environment. This includes Egress Gateways, which forward traffic to subnets, like LANs, and Internet Gateways, which forward traffic to the internet.
In the next section, we’ll discuss setting this functionality. But first, we need to add them to the network. The Netclient is used on Linux, Windows, and MacOS. Other devices will require static WireGuard config files:
-
To add Clients (static WireGuard), we will need a Remote Access Gateway, which we will configure in the next section
-
To add Routers, a custom Client config must be created, which we will do in a later section.
We will not cover how to enroll users with the network, which again will come in a later section.
With that in mind, let us begin.
Adding New Nodes

We will start by adding new Nodes to our server, which are devices running the netclient. Such hosts can be Linux, Mac, or Windows-based. Additionally, such devices can be added using a Docker Container.
Adding new Hosts to your server consists of three steps:
-
Creating an Enrollment Key
-
Installing the Netclient
-
Joining the server with the enrollment key
Hosts that are already enrolled with your server can be added and removed from Networks without using a Key, which we discuss in “Managing Existing Hosts”
Creating Keys

To add new hosts to your server, begin by creating an Enrollment Key.
Enrollment Keys allow devices to enroll with the server. The keys tell the server, and the device, which networks they will have access to. They also determine if the device will be relayed by default, a useful feature if you know your devices are in a restricted environment.
Enrollment Keys are defined by a number of uses, an expiration date, or are simply unlimited, until you delete them. Choose the option that works for you, and select the networks which your devices will be a part of.
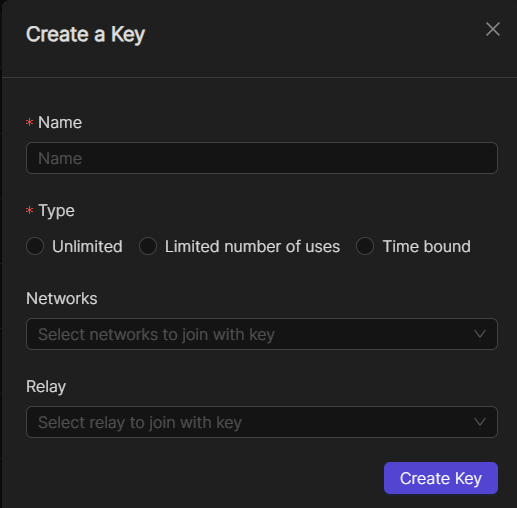
Helpful Hint: You can also create an enrollment key without any network access. This will allow devices to enroll with your server, and an administrator can choose which networks they should have access to. This is helpful for use cases where you may want to allow unknown devices to register with your network, and allow an administrator to review before granting access to the VPN.
Enrolling Devices
After creating the key, you can now add your devices. There is a helpful flow within your Network for “Add Node”. Choose the target platform, which gives you the installation steps for the netclient.
Once the netclient is installed, you will join the server using the enrollment key provided and the following command.
For Docker, you will simply run the Docker container with the provided command.
Helpful Hint for Docker: You can deploy multiple netclient docker containers on a single machine. You just need to have distinct volume mount names for each container.
Once your devices are added to the network, you will see them in two places: within the Devices interface and in the Nodes interface of your network.


Managing Nodes
Nodes added to your server can be managed by an administrator. You can edit things like the private IP, the public Endpoint (how other machines reach the device), and MTU. The netclient sets these settings automatically, which can be overridden if necessary. For instance, a device may have 2 public IPs, and you might want to specify which one to use. A device may also be in a high speed network, where a higher MTU will optimize performance.
Global vs. Network Scope
Hosts have two different “Scopes”, the Network scope and the Global scope. When you go to your network, you will see your Host, and can edit certain network-specific settings, or remove it from the network.

If you go to the sidebar, you get all of your nodes on the server, and can edit global settings, such as the port the Host uses for the VPN.
A Device will only have one network interface locally, and use a single IP and port, even if it is in multiple networks. The agent maintains segmentation between networks, so traffic is not sent where it should not be, but maintaining only one network interface simplifies management.

Network Access Management
Within the Device interface, you can also choose which networks a node is a part of. Simply click to add and remove the host from any networks.
A node will have a different virtual IP for each network it is in.

Notes on Deploying Clients
While adding nodes to your network, you may find that some devices do not support the Netclient. For such devices, we need to use Clients. Clients are added using standard WireGuard configuration files, and have static access to the network via the Gateway interface.

The important thing to note here is that when your network changes, Clients will not update automatically, because they are just static files. Clients, when they created, have knowledge of the following:
-
The VPN subnet range
-
Egress Gateways, Internet Gateways, and additional Allowed IPs added to the network before the client is created.
If you add or remove IP addresses outside the VPN subnet range (for instance, by creating a new Egress Gateway Range), the clients will not be aware of this, and will need to be re-generated.
Thus, typically you want to deploy clients after such gateways are configured. Because of this (and because we will need a Remote Access Gateway to get started) we will wait until after we have configured the Hosts in our network before we deploy our Clients.
Next Steps
Once Hosts are added to the network, it is time to configure them with their various network operations. Some hosts may be just endpoints you wish to access, in which case, you’re done! Other hosts may need to act as gateways or relays in order to route traffic, which we discuss in the next section, including configuring the Remote Access Gateway, which is necessary for a variety of functions.