Accessing the VPN as an End User
Overview
Once you have configured access to the platform for users, your users will need to join. Here are some simple steps for how users accept an invite, download, install, and use the VPN client, Netmaker’s Netmaker Desktop
Accepting an Invite
Users who have been invited to the platform will be sent an email with an invite link, if email is configured. If not, you must manually provide them with the invite link
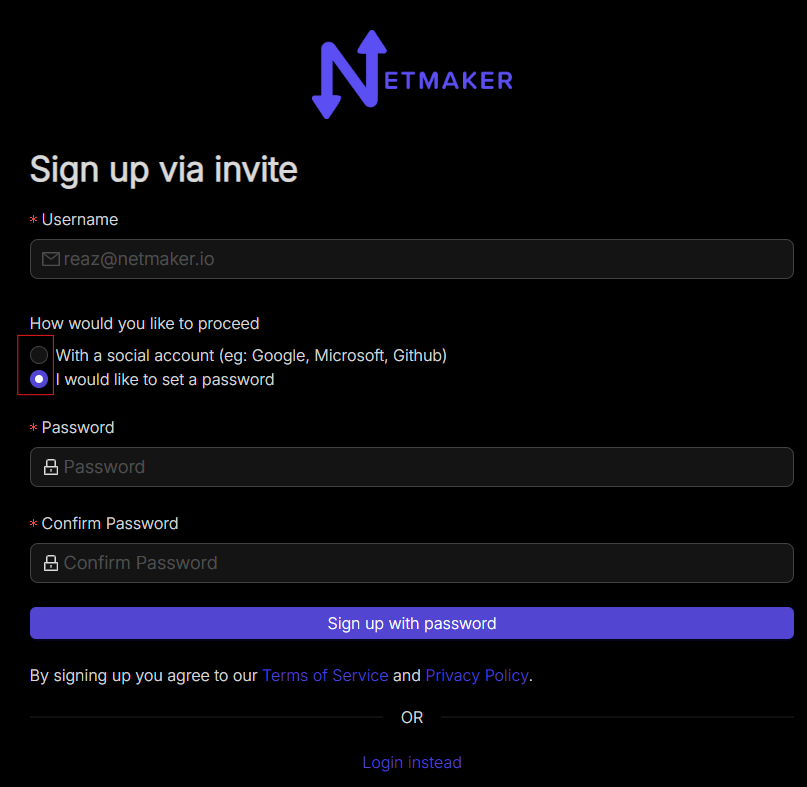
Once they click the link, they will see a registration page allowing them to sign up with SSO (Social Sign On) or by setting a password.
Downloading and Installing the Netmaker Desktop
After signing up, the user should download and install the Netmaker Desktop.
-
Download the platform-specific installer from https://www.netmaker.io/download

-
Follow the installation instructions from the bundler

Note: if installing on a Virtual Machine, you need to include the “Mesa Dependency” package while installing, as shown below.

On successful installation, it will ask to press the “Finish” button to finalize and close down the installer.

After that, users can search for “Netmaker Desktop” and open up the application.

Logging In
To log in, a user will need to specify the netmaker server, and enter their credentials.
Specify Server
The application needs to know which server it is logging into.
On Prem: For On-Prem installations, this will be the API URL, which usually looks like api.<your server domain>
SaaS: For SaaS accounts, this will be the “Tenant ID”, which should be included in the email invite, and can be seen when logging into account.netmaker.io under tenant management.

Enter Credentials
Basic Auth: For basic auth users, they will enter their username and password.
OAuth: To log in using OAuth (SSO), you simply need to click the “Login with OAuth” button and then go through the provider’s login process.
Note: If this is a new registration, the admin of the netmaker server or the netmaker SaaS tenant will be notified of the new user request which needs to be manually approved by the admin, under Pending Users.

Connecting to the VPN
After logging in, users will see the networks and gateways for which they have been granted access.
Gateway Information
Hover over the information icon to view gateway details.

Connecting/Disconnecting
Use the toggle switch to connect or disconnect from a specific gateway and access the network.
Press the Refresh icon to refresh a connection.

Admin Visibility
As an admin, you can see active users in your network, if you navigate to the Node interface and click on the “Active Users” filter, you will be able to see users.

Troubleshooting
OAuth Error

This error is related to the netmaker server not having OAuth setup and enabled. Please request the netmaker server admin to configure and enable OAuth by following the docs at https://docs.netmaker.io/docs/server-installation/integrating-oauth
Checking WireGuard
To look at the wireguard configuration that has been applied by the Netmaker Desktop, you can simply open up your terminal and use the “wg” command to view the current connection status as shown below.
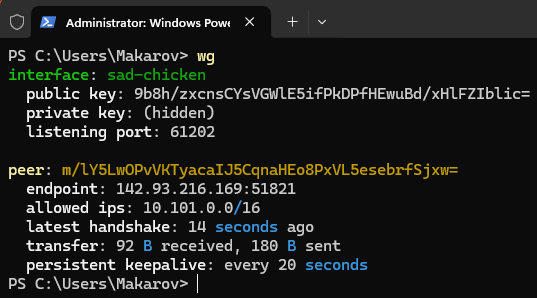
This information can help you diagnose any problems further or simply log the current WireGuard connection status.
Authentication Timeouts and Re-Authenticating
In the Netmaker standalone server environment configuration file, there are two options to set user authentication token validity duration and auto disable a non-admin user’s remote access upon token expiration. These two configuration variables can be found in the netmaker.env file on a standalone netmaker server as shown below.
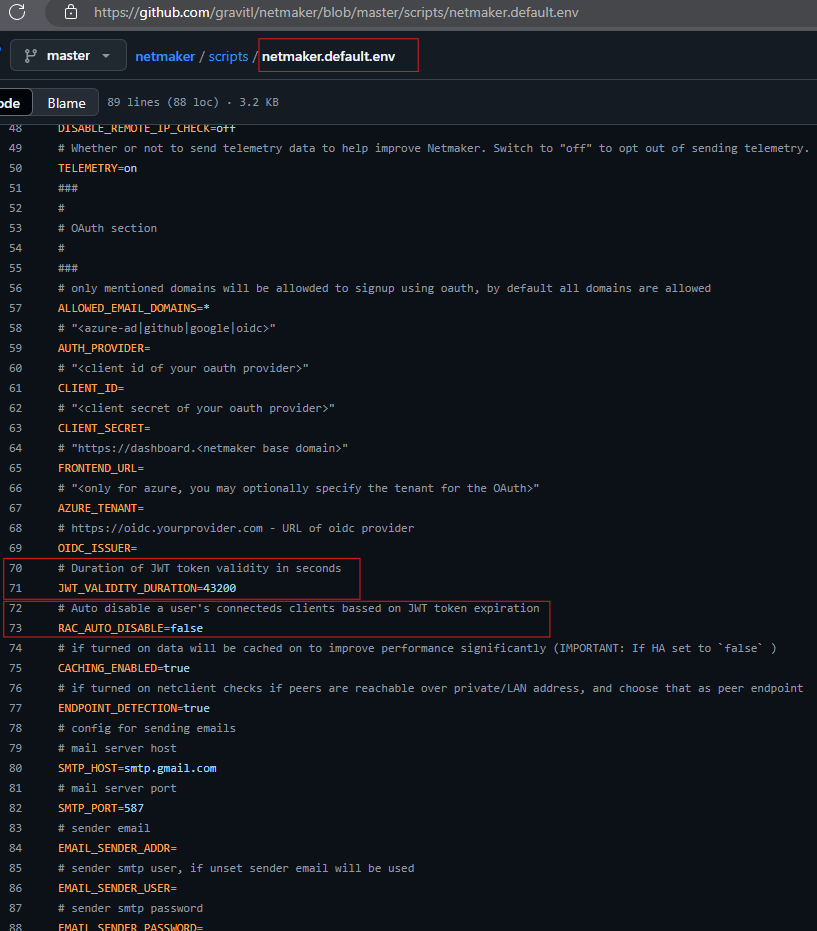
The “JWT_VALIDITY_DURATION” is responsible for expiring the user authentication token after the value in seconds. And if the “RAC_AUTO_DISABLE” is set to true, it will result in authentication timeout and the remote access client user needs to re-authenticate using the rac software for renewing the authentication token and resume normal operation.
Next Steps
Let’s now cover some global troubleshooting, should you run into any trouble while setting up your network.