Planning Your Endpoints
Overview
Now that we have a network (or networks) configured for our VPN, it is time to start adding in the devices that will make up the networks. Before we do this, it is helpful to understand what needs to be deployed, and where. For instance, do you need a Host in the office on a Linux server, or a Client deployed on a Router? Do you need a Relay in the cloud?
This chapter will provide clarity on what devices you will need to add to your network, and how you will need to add them, including supporting features which may be necessary.
By the end of this guide, you should have a good mental picture of which devices you are going to add to the network, and how you will add them (via Netclient or WireGuard config file).
Types of Clients: Netclient, Static File, Remote Access Client
Netmaker has 3 types of Clients: The Netclient, Static WireGuard Files, and the Remote Access Client
|
Client |
Netclient |
Static WireGuard |
RAC |
|
Format |
Headless Daemon |
WireGuard Config File |
GUI App for Desktop, Mobile |
|
OS Support |
Linux, Windows, Mac |
Linux, Windows, Mac, iOS, Android |
|
|
Connectivity |
Peer-to-Peer Always-On |
Via Gateway (Hub-And -Spoke) Always-On |
Via Gateway (Hub-And -Spoke) On Demand |
|
Capabilities |
Act as Hub for other Clients Forward traffic to external environments |
Can be used with many routers to support Site-to-Site Deployable on any device that supports WireGuard |
User auth-based login Session Expiry GUI for Ease of Use |
Netclient (Nodes)
When the Netclient is deployed to your network it appears as a Host in your dashboard.
The Netclient is meant to be deployed on servers, which are either endpoints, or will serve a routing function in the network:
-
Forward traffic to a LAN or Internet
-
Act as Hub for connections from static WireGuard, RAC, or other Netclients
Every network will at least need one Netclient to function, so this is a good place to start.
Netclient In Multiple Networks
A Netclient can be a part of multiple networks simultaneously, and can serve different functions in different networks. After adding a Netclient to Netmaker, you can choose to give it access to different networks. In Network A it could forward traffic to a local network, while in Network B it could just be an Endpoint, or a Relay.
The main use of this is to have dedicated clients which serve as Hubs within multiple networks. E.g. They can route traffic for other clients, without having to deploy a new netclient in every network. The Netclient maintains segmentation between networks, so traffic does not leak.
Example Network with One Netclient: Internet VPN
If you use the Netmaker SaaS or Self-Hosted, you will see an auto-generated network called “internet-access”. This network has only one device in it, which is serving two functions:
-
Receive traffic from other Clients
-
Forward traffic to the Internet
This network is “complete” with just one node. All a user has to do is download the Remote Access Client, log in, and connect, and they now have a functioning full-tunnel VPN.
This could also be done, for instance, to create a Gateway in the cloud to a VPC.
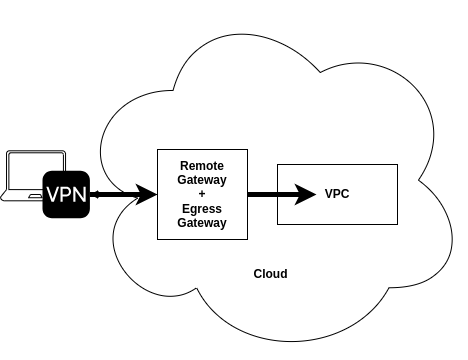
Example Network with Two Netclients: Remote Access VPN
The most common use case we see at Netmaker only requires 2 netclients to function.
Netclient 1: Acts as a Hub for Client connections (Remote Access Gateway)
Netclient 2: Acts as a gateway to a logal network (Egress).
Netclient 1 is deployed in a public-facing environment, so that users can access the network from anywhere.
Netclient 2 is deployed inside the private environment, and configured to forward traffic to the local network.

Example Network with Many Netclients: Overlay Network / Mesh VPN
With servers deployed in the cloud, the office, and at the edge, Company X needed a simple overlay so these servers could all reach each other. So, they installed the Netclient on each server and to make them all accessible from one another.
Static WireGuard (Clients)
If you have endpoints which need access to or from the network, which do not support the netclient, you will want to generate Clients and apply them to these devices.
These are just simple configuration files, which can be used on any WireGuard-compatible device.
These config files use a Hub (Remote Access Gateway) to send and receive traffic with the network.
There are a few reasons you may want to use static clients, rather than the Netclient:
-
You want to deploy static files onto user devices which are “always-on” and admin-managed
-
You want to integrate a device into your network which does not support the Netclient
-
You want to integrate a router into your network
In the case of #3, there is a parameter when generating a Client for “Additional AllowedIPs”. In this field, you can put a LAN range. After applying the file to the router, you can set up routing to and from the local network, allowing communication between the LAN and the VPN.
Remote Access Client
The Remote Access Client is a user-centric App, in which users sign-in using their credentials/oauth, and connect to the VPN. This is the recommended method for connecting to the VPN from end user devices for remote access. These should not be considered “Endpoints” in this context. The RAC generates a static configuration file and applies it to the device “On Demand.” This is typically done after you have finished configuring your network.
In short, for users access via Remote Access Client, we will cover this in a later section, and you do not need to generate clients in advance.
Example Walkthrough
Let’s walk through an example network based on the below diagram, to get an idea of the difference between Netclient and Static WireGuard, and some of the actions they may perform, depending on the use case.

The Environment
In this environment, we have a few servers configured as VPN endpoints, serving different networking functions.
You can see #8 is forwarding traffic to both a Cloud VPC (#9) and the Internet (#10). This endpoint is likely deployed in the cloud, since it must have access to the cloud VPN.
There is an endpoint deployed (#7), which is being relayed via another endpoint (#6). #7 is likely in a restricted environment like an office with CGNAT, while #6 is likely in a more public environment like the cloud or a data center.
#5 is serving as a Hub for static wireguard files, and is likely also deployed in the cloud. Attached to it are 3 files:
-
A file which has been added to a router, with additional routes for an office LAN
-
A file which has been added to an IoT device
-
A file which has been applied to a user’s device via RAC
What this looks like to an end user (#1), is they log in, and they are able to access:
-
A server in a restricted environment (#7)
-
An IoT device (#4)
-
An office LAN (#3, via #2)
-
A Cloud VPC (#9, via #8)
And all other internet traffic is being forwarded to the internet via #8.
Additionally, the devices deployed on this network have access to the same resources as the user (assuming no ACLs have been set).
Let’s walk through the different components of this network.
Static WireGuard Clients
All Static WireGuard must be attached to a Remote Access Gateway, which acts as a Hub for connections. In the diagram, the static wireguard clients are 1, 2, and 4, and they are attached to a Hub at #5. The Remote Access Gateway is just a Netclient, which is specified to be a Hub for these connections.
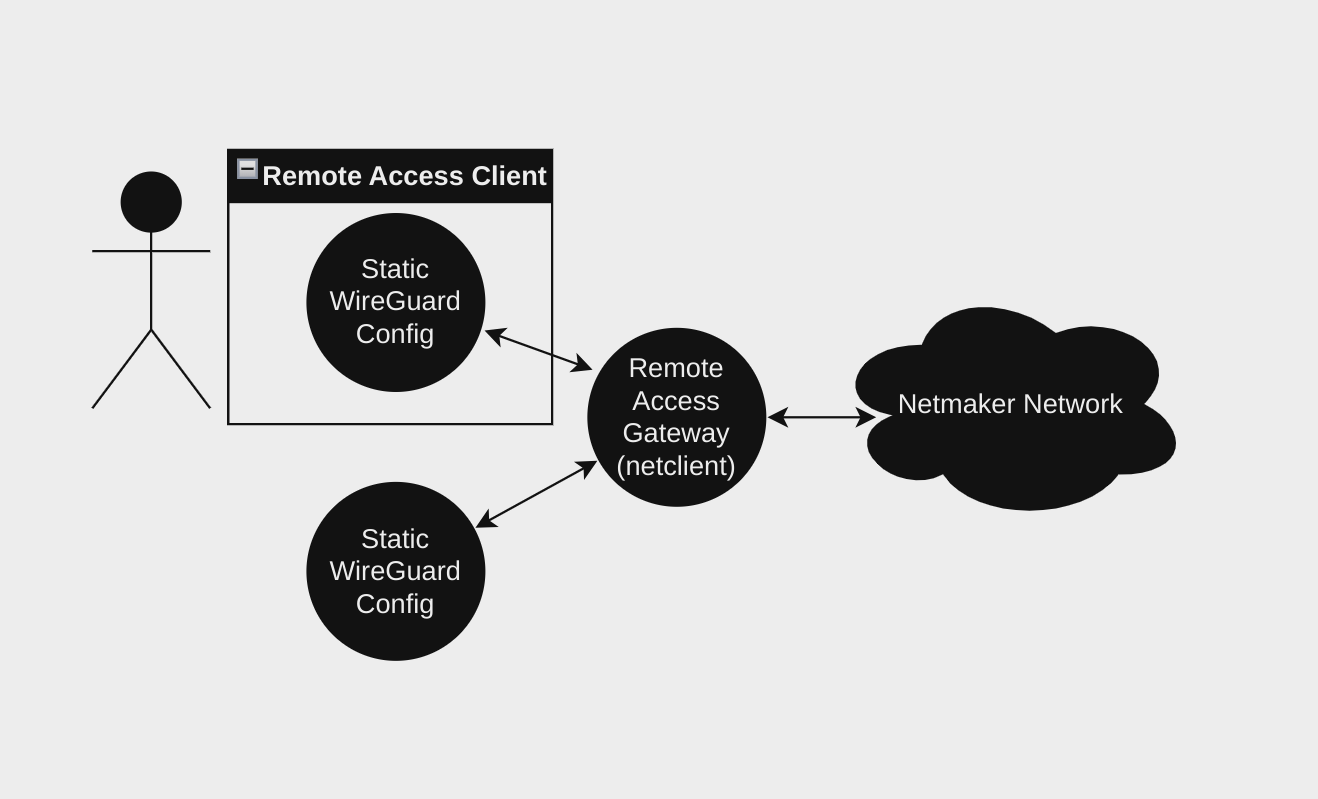
The Netclient which is set as a Remote Access Gateway should run Linux, and have a reliable public IP to act as a Remote Access Gateway.
Static WireGuard files are generated, which when activated, send and receive network traffic via the Gateway.
These config files are either generated manually, by an administrator, or are generated on-demand by remote users, via the Remote Access Client.
These config files are simple, static, WireGuard configuration files.
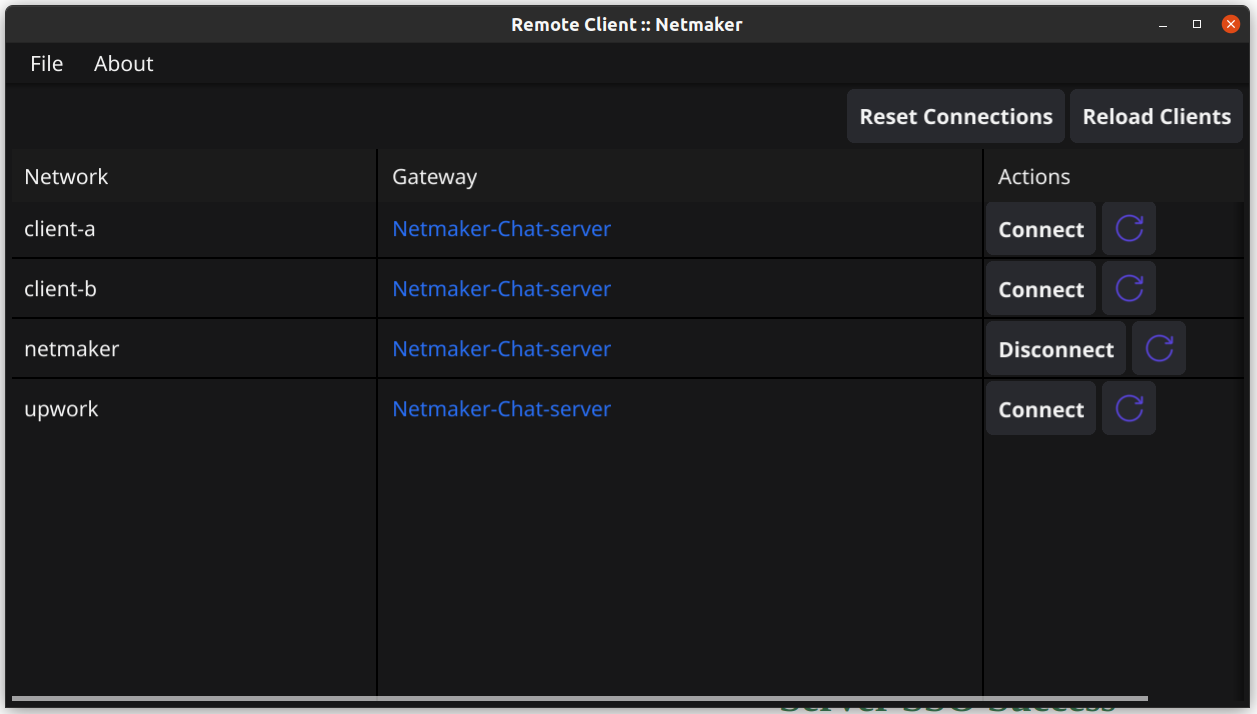
(1) Remote Access Client
Users can be added to a Remote Access Gateway, which allows them to log into the VPN using a local application called the Remote Access Client. This app runs on desktop and mobile devices, and allows users to log in to the VPN using a username and password, or oauth. When users click “connect”, a request is made to the server, a static configuration file is generated, and returned to the client, and applied using WireGuard, giving the user access to the network. Based on server settings, these config files may expire when the users auth session expires.
An administrator just needs to grant users access to the network and provide instructions to download and install the client. Then users can begin accessing the network.
However, note that you will need a Remote Access Gateway set up within your network. In fact, you may want multiple gateways, depending on the scenario.
(2-3) Router and Office LAN
Clients can also be generated by administrators to apply directly to devices. One such use case is for integrating a router.

When generating a Client, you can add optional fields, such as address ranges, which will be applied to the configuration.
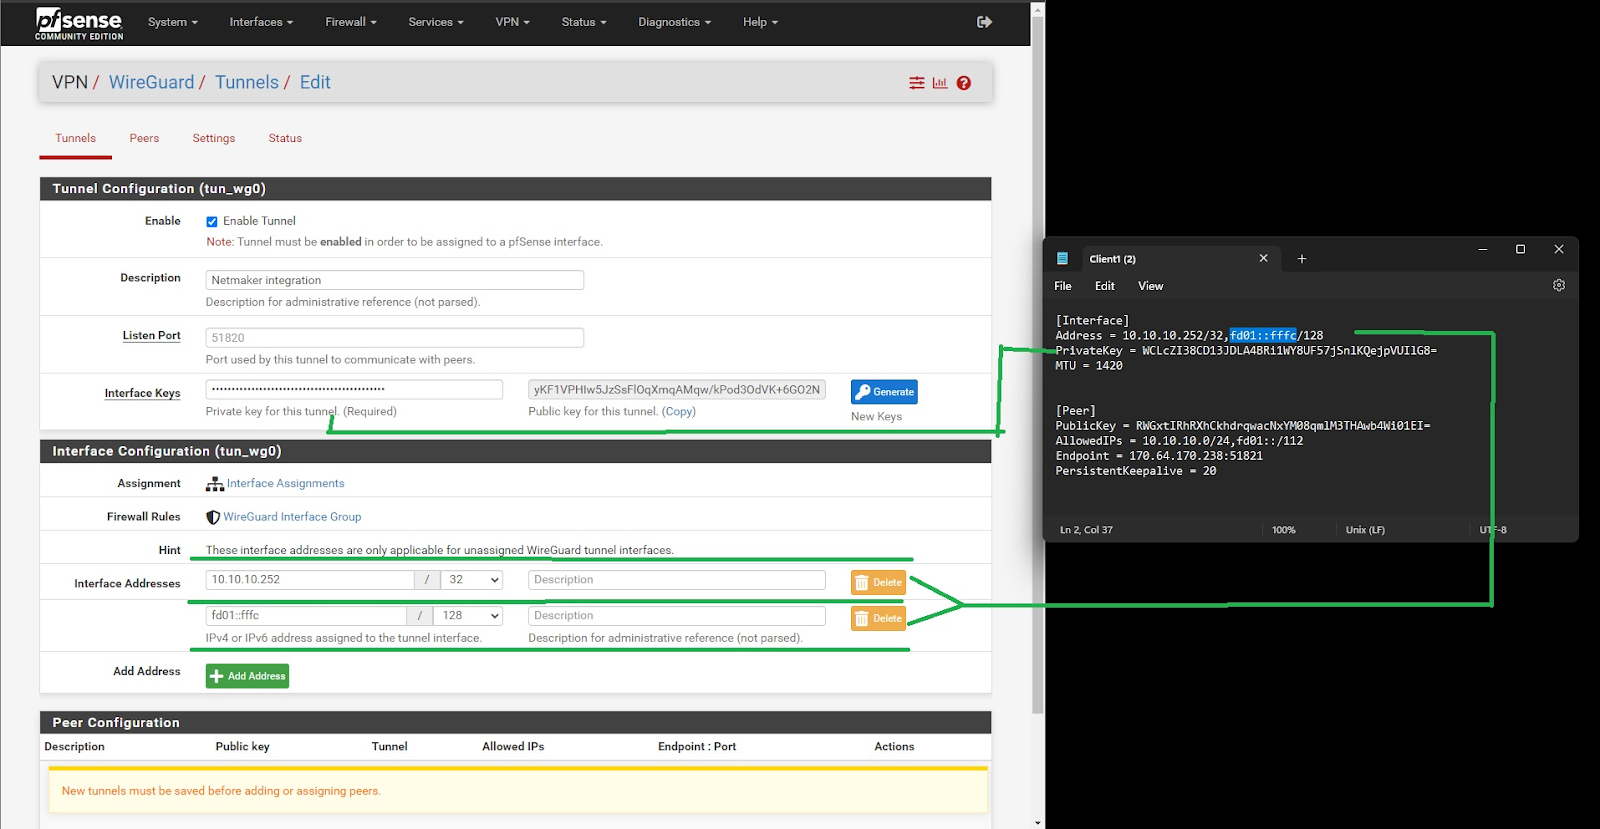
Consider you have an office router that supports WireGuard, and a LAN address range of 192.168.1.0/24. You can add this field to your Client configuration file.

After creating this Client, you can apply then apply the configuration settings to your router, using a WireGuard plugin (in this example, we have a PFSense router). This will allow your LAN to have access to the VPN, and VPN to have access to the LAN, via the Router and Remote Access Gateway.
(4) IoT Device
If you have any other devices that support WireGuard, but does not support the Netclient (remember, the Netclient only runs on Windows, Linux, and Mac), you can add these devices to the network by generating a Client, and applying it to the device using WireGuard. Such a device might be machinery, a robot, a router, or just an unsupported operating system like BSD. Such devices likely just act as an endpoint in the network, which either needs to access the VPN, or needs to be accessed by the VPN (or both).
It is worth noting that you may also want to do this just to provide an always-on config file for users which is not managed by the local user. For instance, you can generate a file, apply it to someone’s laptop, and they will always be connected to the VPN as long as the file is active.
Nodes
All devices added to Netmaker via netclient become Hosts (or “Nodes”). Every network needs at least one node for operations. Hosts are automatically synced across all networks which they are in, and receive updates as Hosts and Clients are added, removed, and modified within the networks.
Once added to a network, an administrator can sete the traffic routing capabilities of the Host. It may just act as an endpoint, in which case this is not necessary. Alternatively, an administrator can set a Host as:
-
a Remote Access Gateway, to act as a Hub for static config files and remote users
-
an Internet Gateway to forward traffic to the internet from the VPN
-
an Egress Gateway, to forward traffic to local or private networks from the VPN
-
a Relay, to forward connections to and from specified hosts (“Always On”)
-
A Failover, to automatically forward connections between hosts, when it detects that peer-to-peer is not working
A Host can be set as one or many of these things. For instance, a Host can be a Remote Access Gateway, an Internet Gateway, a Relay, and a Failover, all simultaneously.
A Host may also just be an endpoint on the network, which users need to access, or which needs to access other endpoints via the network. For instance, a server in your data center.
Typically, different Hosts perform different functions depending on their location. For instance, a host in the cloud is suitable as a Remote Access Gateway or a Relay, while a host in the local office network is suitable as an Egress Gateway for the LAN.
(5) Remote Access Gateway
Most use cases require a Remote Access Gateway. Here, the gateway is routing traffic to and from the three attached Clients (1, 2, 4), as well as accepting forwarded traffic to and from the Office LAN (3) behind the Router client (2).
While this network has one RAG, some networks may have multiple. This would allow an administrator to segment access across different user groups, or to provide multiple access points depending on location.
(6) Relay
Here we have a Host acting as a Relay, routing traffic to and from the Endpoint (7). Like the Remote Access Gateway with Clients, a Relay routes traffic to and from specified Hosts. This is useful if a Host is in an unreliable or restricted environment, like an office behind CGNAT. It makes access easier and more reliable. A Relay can also be useful as a chokepoint for controlling where and how traffic enters or exits a particular environment.
Multiple devices can be deployed behind a Relay.
This relay likely exists in the Cloud, the preferred environment for such Hosts. The administrator probably could have set the Host #5 as a relay (in addition to an RAG), which would remove the need for an additional machine.
(7) Endpoint
Some Hosts are simply endpoints that need access to or from the network. For instance, a server running a database, which developers need to access. There is no need for traffic forwarding or other advanced routing features, this device just needs to be an endpoint in the network, with a virtual IP address. This is the default state of a Host in the network.
In this scenario, the administrator chose to Relay this device via Host #6, likely because it is in a restricted environment, which would make it a “Relayed” host.
(8-10) Egress Gateway / Internet Gateway
Here we have a Host configured as both an Egress Gateway and an Internet Gateway. This means it is routing traffic a local network (9) via one interface and the general internet (10) via its default interface. This means the Hosts and Clients in the network will reach the internet via this device, as well as be able to reach the Cloud VPC.
In most scenarios, it is preferable to use different Hosts as the Egress and Internet Gateways.
Next Steps
By this point you should have a good understanding of what you will need to deploy to set up your network. Once you know which devices will serve as the foundation of your network, it is time to move on to add these devices into your network and configure them for their required role.
We will start with the non-user devices, which are the Endpoints, Routers, Relays, and Gateways of your network. After that, we will move on to configuring user access.