How to Secure IT Operations with Netmaker
This document explains how to use Netmaker to secure IT operations with private, encrypted networks, covering traffic control, scalability, and zero-trust best practices for cloud, on-prem, and hybrid infrastructures.
This guide explains how to securely access resources at remote sites, which is particularly useful for organizations with employees working from home, in the field, or traveling. It is also beneficial for situations where in-office employees need to securely connect to company resources from different locations, such as a server at a production site in another state or country. In our example scenario, we demonstrate how users can securely access critical resources located at remote sites, ensuring reliable and protected connectivity across various locations.
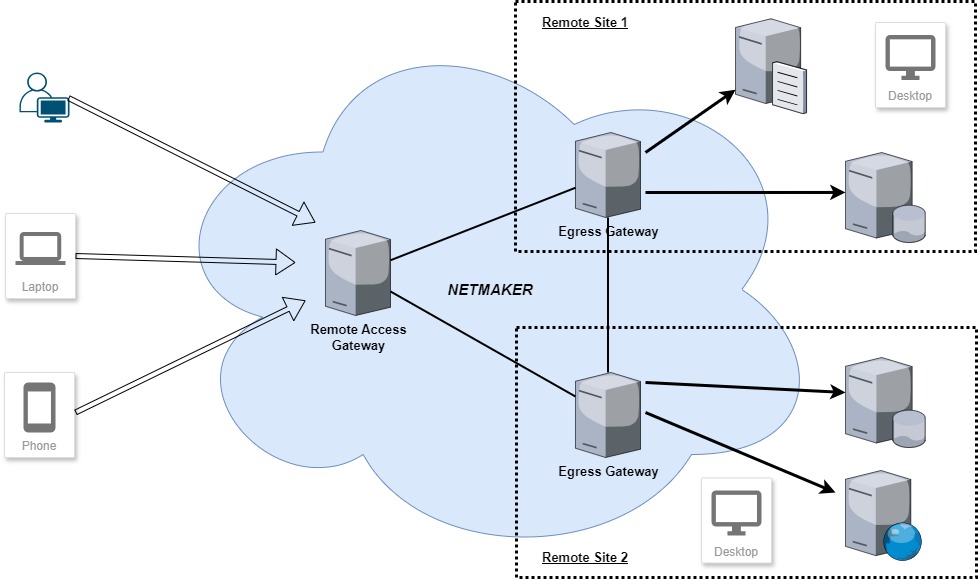
As illustrated in the diagram, users initiate access through the Remote Access Gateway (RAGw), which is part of the Netmaker network. The RAGw then routes this traffic to Egress Gateways—machines that are both part of their respective remote site networks and the Netmaker network. In this scenario, the Egress Gateways operate behind NAT routers.
This tunnel connection provides end-users with encrypted access to remote site resources, such as intranet servers or file servers, ensuring secure and seamless communication between the user and the remote network.
Prerequisites
-
Access to a running Netmaker server, either self-hosted or hosted in the cloud (SaaS).
-
A Linux machine at the remote location.
-
Access to the router at the remote location, or at least sufficient access to add a Port Forwarding rule.
-
OAuth integrated on the Netmaker server (refer here for more information: Integrating OAuth)
General Steps
-
Plan your network.
-
Set up remote access with a Remote Access Gateway.
-
Set up Egress Gateways.
-
Add port forwarding rules on the remote site's router.
-
Onboard users.
By the end, we are going to demonstrate accessing one of the servers at the remote site from virtually anywhere using the Remote Access Gateway.
Plan Your Network
It is essential to ensure that (1) the remote sites, (2) the Netmaker network, and optionally, (3) the end-user network do not have overlapping address ranges. For example, a user connected to a network with the address 192.168.1.0/24 might run into difficulty accessing some resources in a remote site with the same network address. Similarly, a user connected to a network with the address 192.168.0.0/16 will encounter the same difficulties accessing a remote site that has network address 192.168.0.0/24.
But these difficulties only happen when the end users’ network has devices with the same private IP as the remote resources they’re trying to access. In this scenario, the traffic goes in favor of the directly connected devices instead of the target remote devices.
In this guide, we will use the following address spaces:
-
Netmaker network: 100.100.0.0/16
-
Remote Site: 192.168.254.0/24
-
User network: 192.168.111.0/24
We will name our Netmaker network "my-org-vpn". For detailed instructions on creating a VPN network in Netmaker, refer to Create Networks under the Getting Started V2 section.

Setup Remote Access Gateway
In order for end users to connect to our organization’s VPN, we need to set up an Ingress Gateway, which in Netmaker is called the Remote Access Gateway. It is recommended that this machine be publicly available and accessible. While the Netmaker server itself, or the Managed Endpoint (SaaS), by default functions as the Remote Access Gateway, you can also add another one of your machine if needed. Please refer to Add Non-User Devices guide on how to join machines to the Netmaker VPN network, and then to Configuring a Remote Access Gateway on how to assign a machine as the Remote Access Gateway.
If you’re using a different machine, you only need to responsibly expose UDP port 51821 and no other else, as Netclient uses this port to communicate with the Netmaker server and other Netclient devices.
In Ubuntu, we can easily do it with these commands:
sudo ufw default deny incoming
sudo ufw default allow outgoing
sudo ufw allow 51821/udp

#if ufw is not yet enabled,
sudo ufw enable

#if ufw is already enabled,
sudo ufw reloadYou can use nftables as a replacement if you're using Linux machines that have deprecated iptables.
Here is the Remote Access Gateway for this demo.

Setup Egress Gateways
To securely expose resources on the remote site, a Linux machine installed with Netclient and also part of the remote site's network must function as the Egress Gateway. Please refer to Add Non-User Devices guide on how to join machines in the Netmaker VPN network. Same with the Remote Access Gateway, we only need to responsibly expose UDP port 51821 and no other else. Once joined we can do the following steps:
-
In the Netmaker VPN network, click on the Egress tab.
-
Click on Create Egress.
-
Select the machine from the host dropdown.
-
Leave the “NAT egress traffic” switch enabled, then click on Create Egress.
-
Under the Egress Gateways table, click on the newly created host, and then click on the “Add external route” button.
-
In the Update Egress modal form, click “Add range”.
If you want to expose every machine in the network, you can specify 192.168.254.0/24. If you only need to expose a specific number of machines, such as servers, you can specify individual addresses like for example: 192.168.1.1/24, 192.168.254.3/32, or 192.168.254.4/32.

Here is the Egress Gateway for this demo. It exposes two private IP addresses but we’re particularly interested with 192.168.254.4 which is a server machine that we will be accesing later on. The machines—the Egress Gateway and the server machine, are in a private network behind a Mikrotik router.

Since it is behind a NAT router, it is important to set the listening port of the Egress Gateway to static to prevent it from getting auto-relayed by the Failover node (if there is one set) and to prevent the UDP hole punching feature of Netmaker from using another port.
-
Login to Netmaker server
-
Navigate to Hosts, find the machine that functions as the Egress Gateway and hover over the kebab icon then click Edit Host
-
Find the Static Port switch and enable it
-
Then click Update Device

Add Port Forwarding Rules on the Remote Sites’ Router
While Netmaker is capable of punching UDP holes, normally routers, especially corporate ones, should be restrictive. It should block any unnecessary or unused ports entering the private network, so we need to add port forwarding rules with UDP 51821 to allow encrypted VPN traffic into the private network.
In this demo, we will configure it on a Mikrotik router. In its web UI, navigate to IP => Firewall => NAT, then click on the “Add New” button.
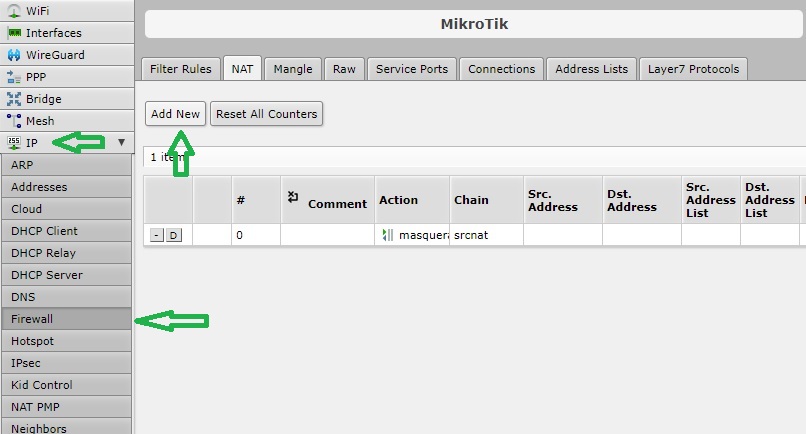
Under the Action section, specify the Egress Gateway’s private IP address in the “To Addresses” field. Then click Apply and OK.
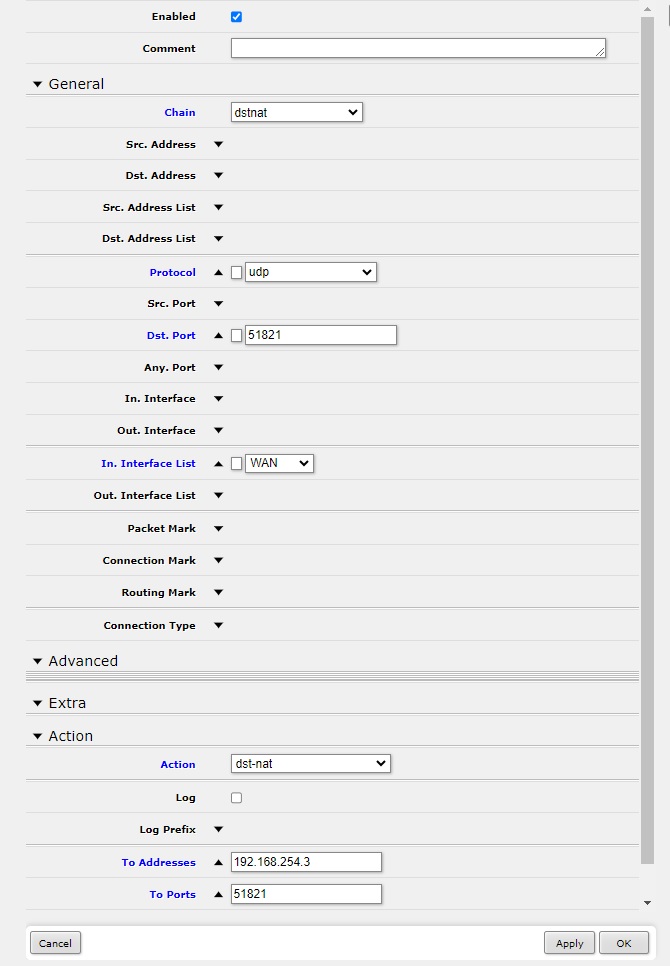
This is how it should look on the table as shown in the image below.

Please refer to your router’s manual or documentation for instructions on how to effectively set port forwarding rules.
Onboarding Users
Now that we have everything set up, we can facilitate end-user access by (1) giving users their access credentials, (2) by sending invites to their email addresses or (3) by letting them signup by themselves using SSO. Please refer to the User Management guide for more information on the user management feature of Netmaker.
In this demo we are going to assign the Service User role to our end users. A Service User is a predefined role in Netmaker that enables users to access the VPN network using the Remote Access Client (RAC) installed on their device. They must log in to the VPN network via the RAC before gaining access. This is much more secure than creating VPN configuration files, as those files can be distributed or reused by another user without requiring login credentials.
Giving Users Their Login Credentials with Basic Auth
The easiest way to create access credentials is by adding just plain username and password, no need to use emails. But this is only applicable on Self-hosted Netmaker servers. We can do so with these steps:
-
Login to the Netmaker Server UI
-
Navigate to User Management by clicking its menu in the side bar
-
Hover over the Add a User button and then click on Create a User
-
Input the Username and Password, tick Service User, click on the Additional Roles Per Network tab and then under the “my-org-vpn“ network (the one we’re using in this guide) we’re going to select the machine that we’ve added as the Remote Access Gateway earlier.
-
Click Create User

We can now instruct the user to download, install, and run the Remote Access Client (RAC) on their device and give them their username and password. But wait a minute, this doesn’t adhere to the principle of Zero Trust, does it? Only the user himself must know his login credentials. While that is true, it all boils down to the use case. Sometimes, users just need access to not so sensitive resources. Otherwise, if IT operations demand tighter security like being HIPAA compliant, we can use the other two options.
Inviting Service Users
This method requires the use of end users’ email addresses as their username. And users set their own password or they can use SSO, more on this later. Invites are sent via email with a link they can use to accept the invitation.
But before we can send invitations, however, we need to setup an SMTP server. If you’re using Netmaker hosted in our SaaS cloud platform you can skip the next part, SMTP is already setup for you.
Setting up SMTP
Setting the SMTP server is necessary to make sure that users receive our invitation via email. But this is only required on Self-Hosted Netmaker.
In this demo, we’re going to use GMail’s SMTP service to function as email sender. You can easily do this on your end too. Just login to GMail and then go to this link to generate an app password: https://myaccount.google.com/apppasswords. It should generate the password in this format: xxxx xxxx xxxx xxxx.
Go to your Netmaker Dashboard, then open Settings and select Email Configuration.

Inviting Service Users
We can finally send invites via email. A little note of caution, avoid inviting temporary email addresses to prevent your account from getting suspended.
Inviting Service Users is really simple. We can follow these steps:
Login to the Netmaker Server UI
-
Navigate to User Management by clicking its menu in the side bar
-
Hover over the Add a User button and then click on Invite User
-
Specify the email address, tick Service User, click on the Additional Roles Per Network tab and then under the “my-org-vpn“ network (the one we’re using in this guide) we’re going to select the machine that we’ve added as the Remote Access Gateway earlier.
-
Click Create User Invite(s), and then click Finish.

You can invite multiple user emails separated by comma, no space necessary.
We can then ask the users to check their email and use the invitation link.
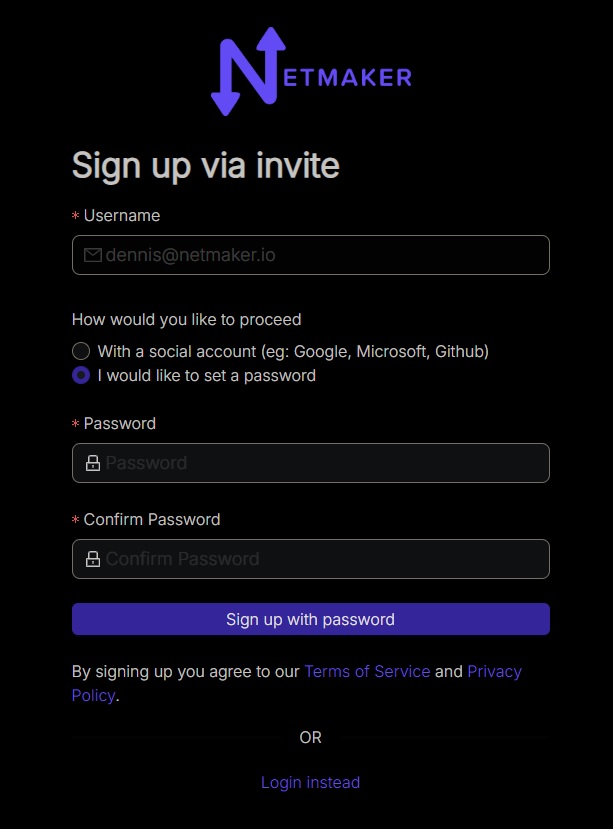
Letting the End Users Sign Up Using the Invitation Link
Using the invitation link is intuitive enough. Our end users can just click on the link or copy-paste it on their browser’s address bar. They will then be presented with two options signing up. Either they choose SSO (Google, Microsoft, Github) or they can opt to provide their own password.
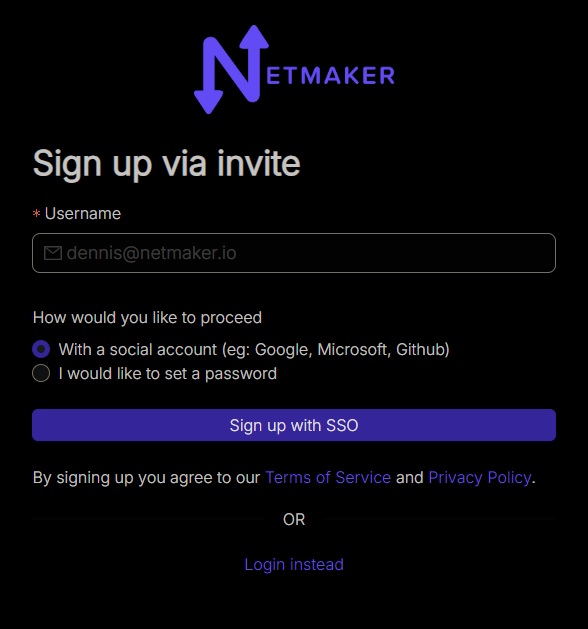
It is important to note that whatever method they go for here will be the same method they will use to sign in with the Remote Access Client (RAC). If they signup with SSO they must sign in with SSO, otherwise with email and password combination.
In this demo, we will opt for the email and password combination.
After signing up, our end users should now be able to login using RAC. More on this later.
Letting Users Sign Up By Themselves
Our end users can signup by themselves to our Netmaker server via the RAC or via the web UI interface. This assumes that you’ve integrated OAuth properly on your Self-hosted Netmaker server and that your users know, or you’ve let them know the domain address of your Self-hosted Netmaker server. Assuming your server’s domain is my-netmaker.my-org.com, your users can visit https://dashboard.my-netmaker.my-org.com with their browser or they can input api.my-netmaker.my-org.com as the Server on RAC.
Once they’re in, they can click “Login with SSO” on web UI or “Log in with OAuth“ in RAC. This button not only logs in existing email but it also signs up new email addresses.

Once signed up, our end users do not have automatic access to the resources. We need to approve their request and then assign the Service User role to them together with permission to the Remote Access Gateway we created earlier.
-
Login to Netmaker as admin or superadmin
-
Navigate to User Management page
-
Click on the Pending Users tab
-
Find the user, click Approve, then confirm approval by clicking OK
-
Go to Users tab, find the user and click its email
-
Select Service User in the Platform Access Level field
-
Click on the Additional Roles Per Network tab and then under the “my-org-vpn“ network (the one we’re using in this guide) we’re going to select the machine that we’ve added as the Remote Access Gateway earlier.
-
Click Update User

Our end user should now be able to login using RAC with SSO or OAuth.
Using RAC to Access a Server in a Remote Site Network
As already stated, Service Users gain access to the VPN network using Netmaker Desktop that they must install and run on their device. On the RAC, they must specify which Netmaker server they must connect to. It is our responsibility as admins to give them this information. When connecting to a Self-hosted Netmaker Server, they must specify the domain name prefixed with “api." as shown in the previous section. When connecting to a Netmaker Server hosted in our SaaS cloud, then they must specify the Tenant ID which is a GUID value you can get from the Tenants table.

In this demo, I’m going to connect to my server domain which is dentest.clustercat.com, using the credentials of the user that we invited earlier:

Since I’ve signed up by specifying the passwords earlier, I need to do the same logging in. Inputting the email and password. Otherwise, in case of SSO, I just need to specify the Server, leave the Username/Email and Password fields blank, and then click on the “Log in with OAuth” button. After I’ve logged in, I can see the Ramote Access Gateway assigned to the account earlier. I don’t have access to the network just yet, I need to click on the Connect button.
In case you’re wondering what the [>]button means, it allows you to specify which endpoint to connect to. Since in this demo the Remote Access Gateway we’re using is a dual-stack machine, it give us two options whether to connect with its public IPv4 endpoint or its public IPv6 one. If your users’ ISP provided them with IPv6 internet connection then they can connect to the IPv6 endpoint.
After connecting to the Remote Access Gateway you can see that a WireGuard tunnel interface got created on my machine by the RAC, enabling me to access the server in the remote site (192.168.254.4) like it is just in an adjacent network. As you can see, the traffic hopped first on the Remote Access Gateway (100.100.0.2), then on the Egress Gateway (100.100.0.3), and lastly on the target machine.

Since I’ve configured the remote machine to accept SSH connection, I can get to it using its private IP address.

Notice that we’ve only allowed UDP port 51821 on the Remote Access Gateway and the Egress Gateway machines, but we’re able to do SSH on the remote server. SSH requests, and all the other requests in fact, are encapsulated by the WireGuard tunnel protocol. Thus if the remote site has an intranet, you can access it without having to allow HTTP or HTTPS traffic on the Remote Access Gateway or the Egress Gateway machines.
Hope you find this guide helpful and informational.