Securely Interconnecting EC2 Instances Across Private Amazon VPC Subnets Using Netmaker
Overview
Amazon Virtual Private Cloud (VPC) lets you provision a logically isolated networking environment with full control. A VPC contains one or more subnets, which are IP address ranges. Subnets can be public or private:
-
Public Subnets have a direct route to an Internet Gateway. Resources in these subnets can access the internet directly.
-
Private Subnets lack a direct internet route and require a NAT device (NAT Gateway or NAT Instance) to initiate outbound internet connections.
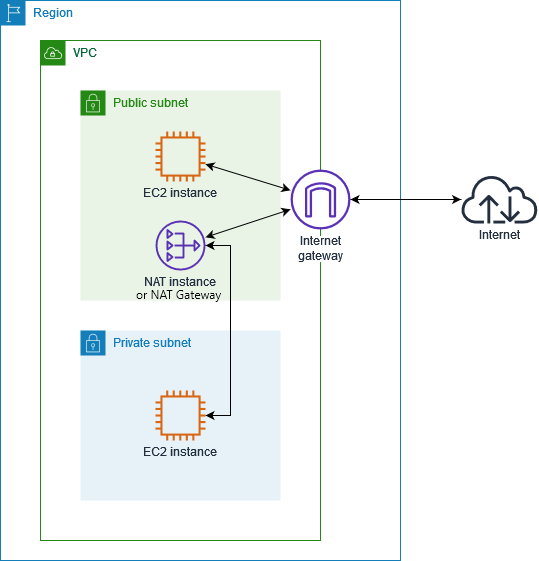
AWS provides two NAT options:
-
NAT Gateway (fully managed by Amazon): Allows private subnet resources to access the internet, but does not support port forwarding.
-
NAT Instance: A self-managed EC2 instance that supports port forwarding.
Additionally, Security Groups act as virtual firewalls, controlling inbound and outbound traffic for associated resources.
Goal
Connecting devices behind NAT or restrictive firewalls can sometimes be tricky. This guide is intended to help you securely interconnect EC2 instances within private subnets across different VPCs—whether or not those instances have Netclient installed. It covers both Netmaker Pro and Community Edition scenarios.
Prerequisites
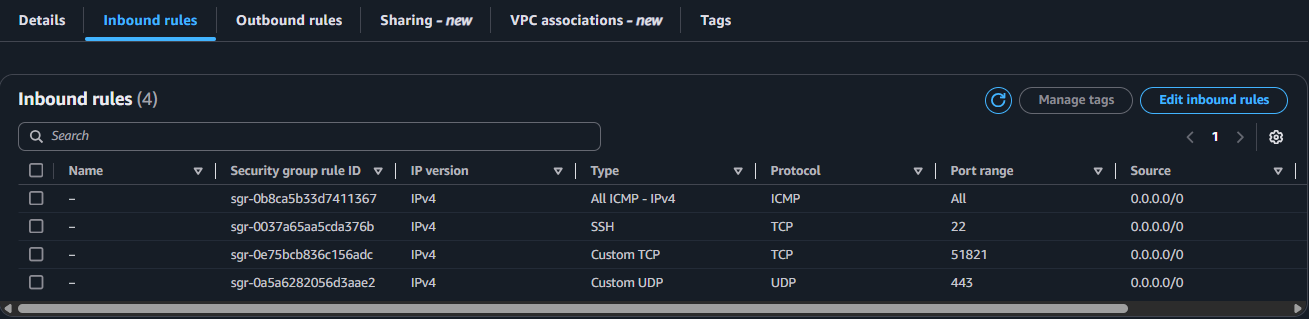
Netclient uses UDP port 443 by default to communicate with other Netclients. This port must be allowed in your security group. Additionally, Netclient uses TCP port 51821 by default for endpoint detection and metrics collection. Although not required, we recommend allowing this port in your security group as well.
For more information about the advantages of the endpoint detection feature, please refer to this knowledge base article:
What is Endpoint Detection?
If firewall is running on your EC2 instances, you’ll also need to allow these ports on each instance.
It’s also a good idea to temporarily enable ICMP traffic for testing purposes.
Advantages of Netmaker Pro
Netmaker Pro is fully capable of interconnecting hard-to-reach edge devices without much intervention. It allows you to designate a publicly reachable device—such as the Netmaker Server—as a Failover Node. With this feature, Netmaker detects if any peers in the network are unable to communicate directly—for example, EC2 instances in different private subnets behind NAT. Once identified, Netmaker automatically reroutes the traffic through the Failover Node, enabling these peers to connect with each other via that node.
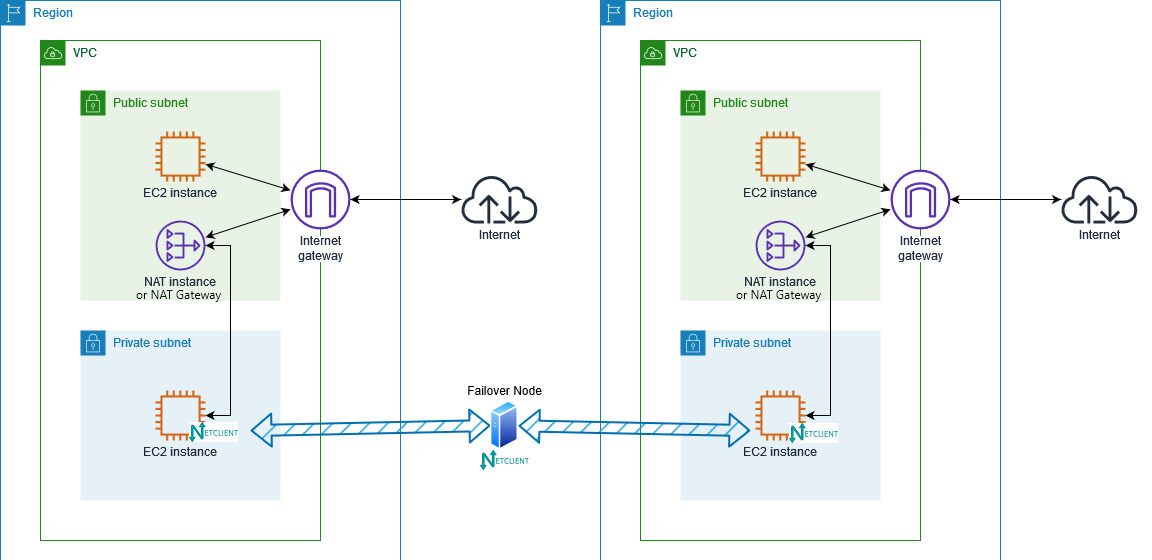
See this guide for instructions on how to set a device as a Failover Node. You can only designate one device as a Failover Node per VPN network. Note that this feature only works if the EC2 instances are running Netclient.
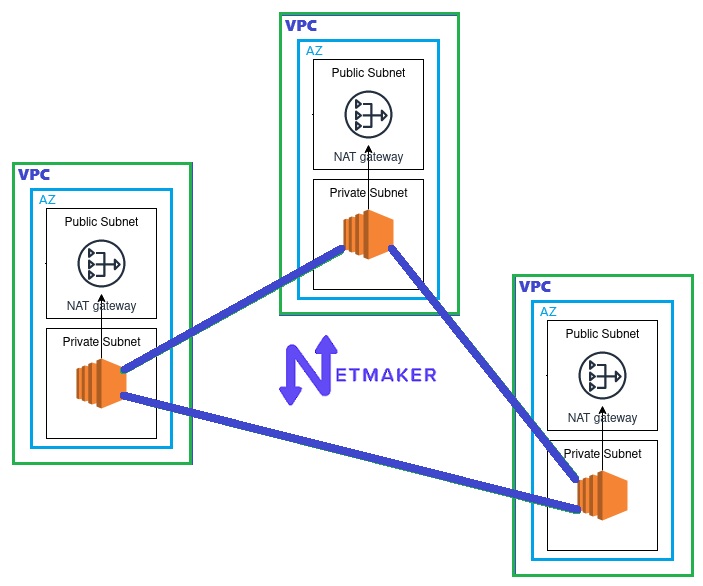
In scenarios with hundreds or even thousands of devices in a network, a single Failover Node might not be sufficient. Fortunately, Netmaker Pro offers another feature: the [Relay] Gateway. You can assign as many Relay Gateways as needed. Relay Gateways allow you to control which nodes they relay traffic for. A Relay Gateway can be any public machine (similar to the Failover Node shown in the image above), or it can be an EC2 instance running Netclient in a public subnet, which then relays traffic to EC2 instances in a private subnet within the same VPC (as shown in the image below).
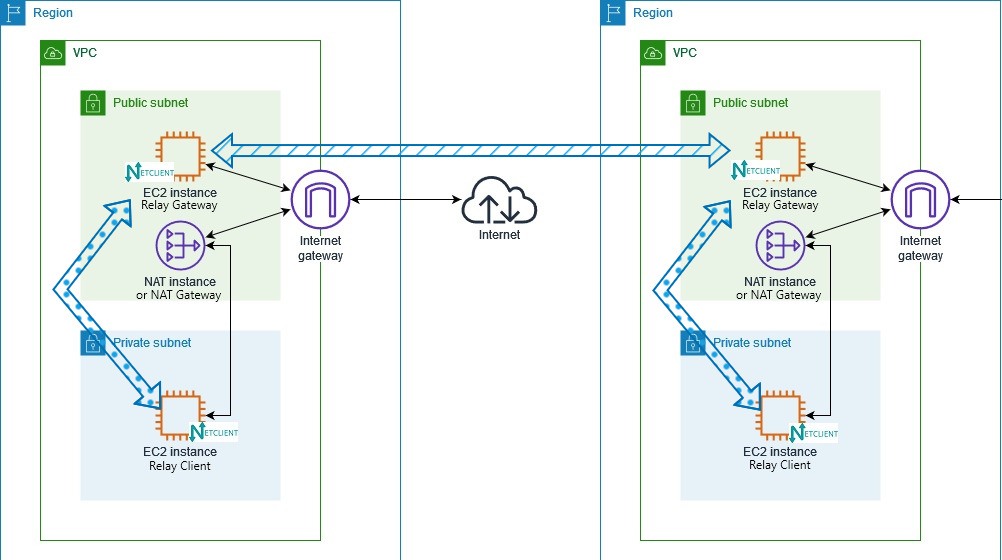
See this guide for instructions on how to set up a device as a [Relay] Gateway and how to assign [Relay] Clients to it.
If using a Failover Node or [Relay] Gateway is not an option—such as when using the Community Edition of Netmaker, or when aiming to minimize traffic hops—then additional manual configuration on AWS and on the devices are needed.
For Community Edition Users
[Relay] Gateway becomes available in Community Edition starting version 0.90.0.
To enable EC2 instances in different private subnets to communicate with each other, tedious manual configurations—such as setting port forwarding and routing rules—are necessary.
As stated in the overview of this guide, port forwarding can only be performed on a NAT Instance, not on a NAT Gateway. The next section provides guidance for EC2 instances behind a NAT Gateway. For now, let’s focus on a scenario using a NAT Instance.
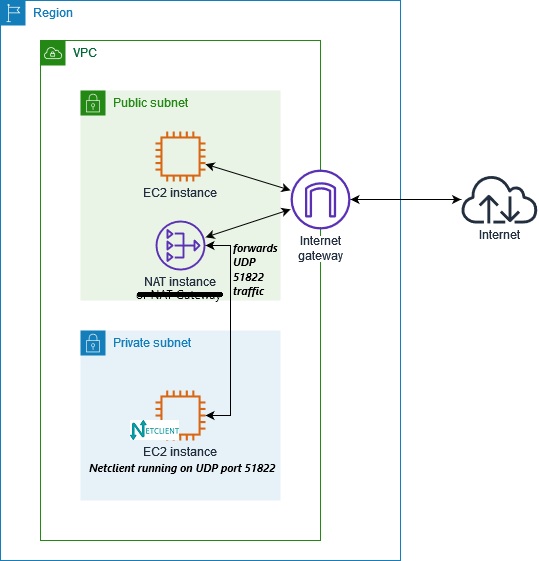
The first thing to consider is the UDP port range that will be used. If you have multiple EC2 instances behind a specific NAT Instance, each must have its own unique port number. The dynamic and/or private port range from 49152 to 65535 is ideal. If you have multiple private subnets, you may reuse the same port range across them, for example:
-
Subnet 1 – UDP ports 51821–52821
-
Subnet 2 – UDP ports 51821–52821
However, during our tests, we found a quirk in how AWS handles this setup. It’s not strictly required, but we recommend using different port numbers across private subnets.
Once you've planned out your ports, create a security group allowing the full range. This range must be allowed both on the public subnet (where the NAT Instance resides) and on the private subnet security groups.
Then, on your NAT Instance, run the following command to set up port forwarding rules:
iptables -t nat -A PREROUTING -p tcp --dport <custom-port> -m addrtype --dst-type LOCAL -j DNAT --to-destination <target-intance-private-ip>:<custom-port>
For example:
iptables -t nat -A PREROUTING -p udp --dport 51821 -m addrtype --dst-type LOCAL -j DNAT --to-destination 192.168.0.140:51821You’ll need one corresponding rule for each EC2 instance running Netclient behind the NAT Instance.
Review the configured rules using:
iptables -t nat -v -L PREROUTING -n --line-numberTo delete a rule, use:
iptables -t nat -D PREROUTING <rule-number>Once everything looks good, save the rules using iptables-save/iptables-restore or the iptables-persistent package.
Your rules should look something like this:

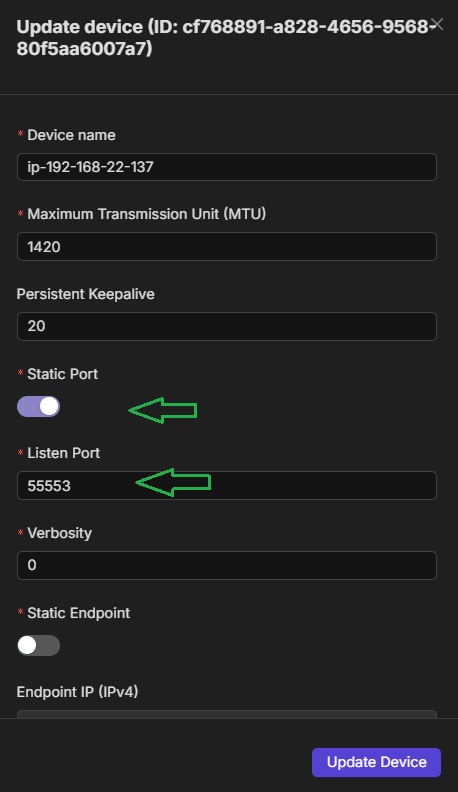
Then, access the NMUI, navigate to the Devices page, and set each device's port to static using its corresponding port number.
Once completed, EC2 instances behind the NAT Instance should be able to securely communicate with other nodes in the Netmaker network—directly, just like public machines—via the encrypted tunnel.
Securely Interconnecting EC2 Instances Behind a NAT Gateway
This guide is similar to the full mesh site-to-site setup, but is specific to AWS.
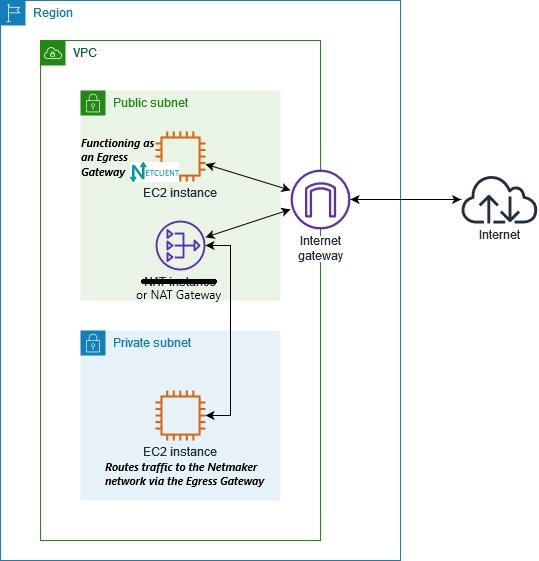
In this scenario, you don’t need to install Netclient (or anything at all) on the EC2 instances located in the private subnet behind a NAT Gateway. Just need another EC2 instance in the public subnet (same VPC) running Netclient to function as a secure tunnel gateway into your Netmaker network.
During our testing, we discovered that AWS does not route typical private subnet traffic to the public subnet by default. Therefore, your Netmaker network must use the Shared Address Space: 100.64.0.0 – 100.127.255.255, which we always recommend.
Once the public EC2 instance with Netclient has joined your Netmaker network, configure it as an Egress Gateway, responsibly exposing the entire private subnet—or just a subet of it. Suppose you have:
-
Public subnet:
192.168.56.0/28 -
Private subnet:
192.168.56.128/28
You can expose the entire subnet (192.168.56.128/28) or just some specific hosts, such as:
-
192.168.56.130/32 -
192.168.56.135/32, etc.
You may enable or disable NAT for egress traffic, depending on your use case. If NAT is enabled, the source address of all traffic entering your private subnet will appear as the Egress Gateway's Netmaker IP. If disabled, the source address will be the requesting node's IP from within the Netmaker network.
If you enable NAT, nodes in your Netmaker network can initiate and reach EC2 instances in your private subnet—but not vice versa.

To allow reverse communication, add a route in your VPC so that traffic from the private subnet knows how to reach the Netmaker network via the Egress Gateway.
For example, if your Netmaker network is 100.110.0.0/24, you can configure the route as shown in the image below.
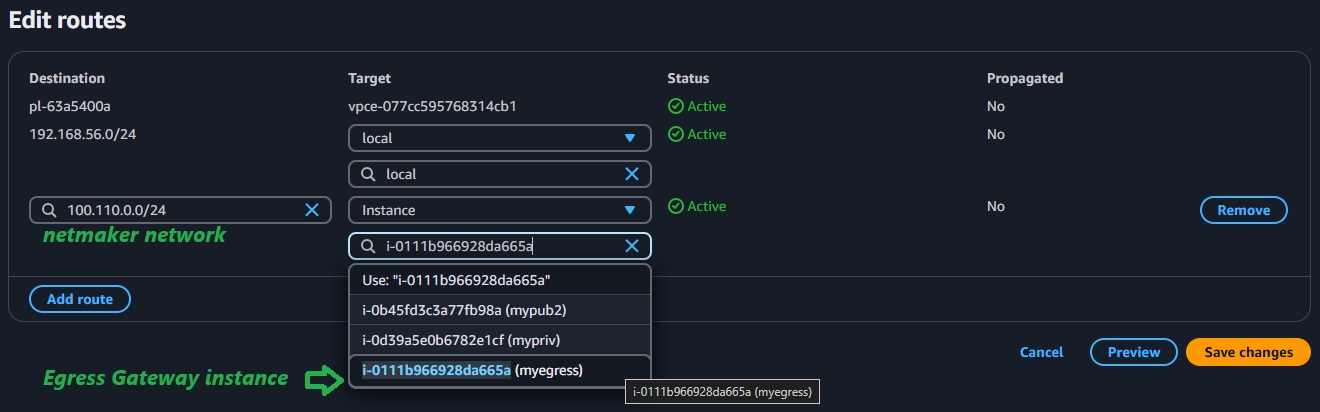
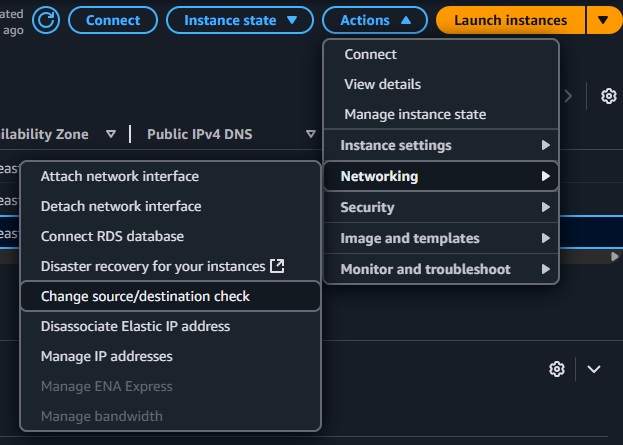
Additionally, since the Egress Gateway EC2 instance is not always the source or destination of the traffic it handles, source/destination checks must be disabled on it. To do this:
-
Select the EC2 instance.
-
Go to Actions > Networking > Change source/destination check.
-
Tick the Stop checkbox and save.

And that’s it! Two-way communication should now be possible between your EC2 instances in the private subnet and nodes in your Netmaker network.
One last thing to note is that you must manually manage the routes. If new egress ranges are added, you’ll need to manually add a routing entry for each one.